
NBI Clearance Online — Here at NBI Clearance Online, we pride ourselves on being your go-to source for all things NBI Clearance Online. And guess what? We’ve cooked up something special just for you – a fresh, updated guide on effortlessly tackling the NBI Clearance Online application process.
We get it; the question of how to apply for an NBI Clearance Online has been thrown at us more times than we can count. It’s like a digital riddle, and we’re here to be your online sherpa, guiding you through the twists and turns of this process.
So, what’s our secret sauce? It’s as straightforward as your favorite recipe: Step 1 – Go to NBI Clearance Online and register an account. Easy, right? That’s the initial stride in a series of steps that lead to your shiny new NBI Clearance.
Curious about the latest and greatest tips for 2024? We’ve got you covered! Our updated article on “How to Apply for NBI Clearance Online in 2024” is packed with the freshest insights to make your online journey a breeze.
Still feeling a bit perplexed? Don’t worry; you’re not alone. That’s why we’re rolling out the red carpet for our comprehensive guide on NBI Online Registration. No fancy tech jargon or confusing instructions – just a friendly roadmap to help you breeze through the process.
And here’s our promise: read the entire article, and if you’re still left with a question mark hanging over your head, drop us a comment. We’re not just throwing words into the digital void – we’re here for you. Your questions are our cue to dive deeper, explain further, and ensure you’re on the right track.
Ready to embark on this NBI Clearance adventure together? Let’s get started!
A. NBI Clearance Requirements
Embarking on the journey of securing your NBI Clearance Online is a significant step toward various opportunities. To ensure a seamless experience, it’s crucial to acquaint yourself with the prerequisites that form the foundation of this process. In this guide, we are committed to providing you with a clear, user-friendly roadmap to navigate the essentials for a successful NBI Clearance application.
Before diving into the specifics, let’s understand the importance of being well-prepared. Familiarizing yourself with the NBI Clearance Requirements sets the stage for an efficient and hassle-free application experience. We’re here to make this journey as smooth as possible for you.
Valid IDs: The key to a successful NBI Clearance application begins with having the right identification documents. We’ve compiled a comprehensive list to cater to various needs:
- Social Security System ID (UMID)
- Government Service Insurance System ID (UMID)
- Passport
- Philhealth ID
- Voter’s ID or Certificate of Registration
- BIR / TIN ID
- PRC License
- Driver’s License
- Alien Certificate of Registration (ACR)
- Pag-IBIG ID (not the Loyalty Card)
- NSO / PSA-Authenticated Birth Certificate
- Postal ID
- Police Clearance
- Certification from the Local Civil Registrar
- School ID
- Solo Parent ID
- Seaman’s Book
- Senior Citizen ID
- MARINA ID
- Security License ID (for security guards)
Make sure to bring Two (2) Valid IDs from the list.
Confirmed NBI Online Appointment: Securing a confirmed online appointment through the official NBI website is a pivotal step. This not only streamlines your visit to the NBI Clearance center but also plays a crucial role in managing the flow of applicants. It significantly reduces waiting times, ensuring an efficient and hassle-free experience.
Completing the necessary payment for your scheduled NBI Clearance Online appointment is equally essential. An unpaid appointment is considered incomplete and may lead to complications. By understanding and fulfilling this requirement, you contribute to the overall efficiency of the application process.
A. Register an Account with NBI Clearance Online
- Access the Official NBI Clearance Website:
Launch your internet browser and go to the official NBI Clearance website at clearance.nbi.gov.ph.

- Agree to Terms and Close Data Privacy Content:
On the initial window, click the “I Agree” button and then proceed to click “Close.” No need to go through the Data Privacy Content; it’s just a formality.

- Navigate to the Registration Box:
On the right side of the webpage, locate the “REGISTER” box. Focus on the “DO YOU HAVE AN NBI CLEARANCE ISSUED FROM 2014 TO PRESENT?” option. Tick the “NO” box to update the NBI Clearance Online Registration Form.

- Fill Out Personal Information:
Begin completing the form with your Personal Information, including Gender, Civil Status, Birth Date, complete name (First, Middle, and Last name), mobile number, an active email address, and a secure password.

Check the box next to “READ and ACCEPT TERMS OF SERVICES,” and click the “AGREE” button.
Confirm that you’re not a robot by ticking the “I’m not a robot” captcha.
Double-check the information for accuracy; it cannot be edited later. If satisfied, click the “Sign Up” button.
- Receive and Enter One Time Password (OTP):
Shortly, you’ll receive a One Time Password (OTP) on your registered mobile number. Enter the OTP correctly in the designated field on the webpage and click the submit button.
")
If you haven’t received the OTP within 5 minutes, request a resend by clicking “RESEND ONE TIME PASSWORD.” Note that the OTP has a 5-minute expiration window.

- Check Email for Activation Link:
After providing the OTP, A new window will pop up, indicating that an email has been sent to your registered email address.

- Open and Read Activation Email:
Open your email inbox (used during registration) and locate the email sent by “NBI Online Services.”
Read the email contents carefully.

- Activate Account through Email Link:
Inside the email, click the “Activate Account” link. This will redirect you back to the NBI Clearance website.

- Confirm Activation:
After successfully following the email link, you’ll see a confirmation screen stating that your NBI Clearance 2024 Account is now activated. Congratulations! You’re now ready to log in to your account (WWW.NBI CLEAREANCE.GOV.PH LOGIN).

And there you have it! You’ve successfully completed the NBI Clearance 2024 registration process.
B. NBI Clearance Online Account Login
- Access Your Account
To proceed, click the “Login” text link, which redirects you to the same page where you initially registered.

On the upper right side of the screen, locate the “Sign In” section.
Enter your registered email address and password.
Click the “Sign in” button to access your NBI Clearance Online account.
C. NBI Clearance Application Form
- Complete Applicant Information Form:
Since this is your first login for NBI Clearance application, the website will prompt you to fill out the NBI Clearance Online 2024 Applicant Information Form.

Enter any missing personal information accurately. Once all required details are filled, click the “SAVE INFORMATION” button below.
- Review and Confirm Information:
A pop-up window displays all the personal information you entered. Take a moment to review this data carefully for accuracy, as any mistakes will reflect on your printed NBI Clearance issued by www.nbi clearance.gov.ph.

If you are certain and content with the provided information, click the “Submit” button.
By completing this step, you’ve successfully filled out the NBI Clearance Online application form. The next exciting move in this process? Scheduling your NBI Appointment! Stay with us as we guide you through the next steps.
D. Schedule an Appointment for NBI Clearance Application
- Initiate Appointment Process:
For desktop users (on the right side) or mobile users (at the top), locate the “APPLY FOR CLEARANCE” button and click it to kickstart your NBI Online appointment process.

- Select Valid ID and Agree:
After clicking, a pop-up window appears, prompting you to choose a valid ID from the dropdown list.
For example, select UMID (SSS and GSIS), input the ID number, and click the “I AGREE” button.

- Review Important Information:
Another pop-up window provides essential information. It emphasizes that after selecting your payment option, you’ll receive a registration code or reference number. This serves as your pass for NBI Clearance Processing Area entry.

Close the window once you’ve finished reading.
- Navigate NBI Clearance Appointment System:
The system presents four key components: NBI Branch, Date and Time of Appointment, NBI Clearance Fee, and payment mode for the fee.

- Select Preferred NBI Branch:
Choose the NBI Branch where you want to process your NBI Clearance (www.NBI.GOV.PH Online). Pick the most convenient location.

- Choose Appointment Date and Time:
Once the branch is selected, available appointment slots will be displayed on the calendar. Click on your preferred date, considering AM or PM time slots.

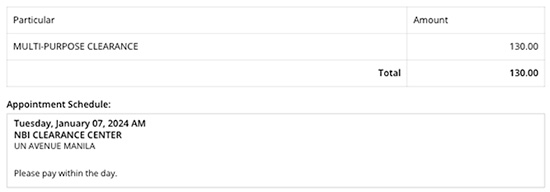
- Verify Appointment Schedule:
Check if the “Appointment Schedule” section reflects the chosen NBI Branch and the selected Date and Time for your appointment or www.nbi.gov.ph online appointment.
- Select Payment Option:
To finalize your appointment, choose a payment option. GCash or Paymaya is recommended for convenience.

- Use GCash for Payment:
In this example, select GCash as the payment option. A small pop-up window appears; click “PROCEED” and “Proceed to Payment.”

Disregard the displayed amount (P130) as it’s not the final fee.
 as it's not the final fee.")
- Payment Details and QR Code:
Upon clicking, a window displays a QR code (not necessary for GCash payment).
Below, you’ll find the fee breakdown: NBI Clearance Fee (P130) and a System Fee (P30), totaling P160.00.

Get ready for the next phase of your NBI Clearance Online journey – the upcoming step will guide you through the seamless process of making your NBI Clearance Fee payment.
E. NBI Clearance Fee Payment
- Access GCash Mobile Application:
Open your GCash mobile application and log in.

Ensure your GCash account has a balance of at least P160 to cover the NBI Clearance Fees.

- Navigate to Bills Section:
Next, tap the “BILLS” icon located on the GCash dashboard.

- Search and Select NBI:
In the search box, type “NBI,” and the NBI logo will appear. Select it.

- Enter Payment Details:
Enter the amount of P160, your reference number, contact number, and email address. Press the “NEXT” button at the bottom.

- Select Payment Source:
In the Payment Source page, choose “GCASH” and then press “next.”

- Confirm Details:
On the Confirmation Page, double-check your NBI Clearance reference number to ensure its correctness.

Note: Entering an incorrect Reference Number may pose challenges for obtaining a refund. Exercise caution in this step.
- Complete Payment:
Once you’re certain that your NBI Clearance Reference Number is accurate, press “confirm” to complete the payment.
- Receive Payment Confirmation:
After a successful NBI Clearance Fee payment, you will receive another SMS message on your registered mobile number, confirming that NBI Online Services has received your payment.

Congratulations! You’ve successfully settled your NBI Clearance Fee using GCash. Don’t forget to capture a screenshot of the receipt for your reference. The next step awaits you in your NBI Clearance Online journey!
F. (OPTIONAL STEP) Verify Your Scheduled NBI Online 2024 Appointments and Payment Status
- Check Appointment and Payment Status (Optional):
(Please note that this step is only Optional) For your convenience, revisit the NBI Clearance website and navigate to the Transactions page.
:")
Here, you’ll find a detailed record of your booked appointments and their current statuses.
- Review NBI Clearance Online Appointment Booking Status:
In the example, two appointments were booked (NBI Reference Numbers MP6BBBYYY and MP82AAAXXX) on the same day, January 05, 2024, at 12:00:00.
The MP82AAAXXX appointment has a status of “PAID” with a note stating “[GCASH] Auto Validated on 12/08/2023 10:32:55 AM,” indicating that the GCash payment was successfully received by NBI Online Services.
As for the other appointment (MP6BBBYYY), it remains unpaid. Remember that you only need one confirmed and paid appointment.
RELATED READING: Clearance NBI.GOV.COM.PH – How To Apply NBI Clearance
G. Processing Your NBI Clearance at the NBI Branch
With all the essential steps completed – from account registration, form filling, appointment scheduling to the payment of NBI Clearance fees – the next and final phase is processing your NBI Clearance at your selected branch. Simply await the appointed date and head to the designated NBI Clearance Branch.
- Arrive Promptly for Your Appointment:
On the day of your appointment, make sure to arrive at the NBI Clearance Branch during your scheduled time slot, either in the morning or afternoon.
- Prepare Necessary Documents:
Bring your valid IDs, your NBI Clearance Reference number, and a screenshot of your NBI Clearance Fee receipt (in our previous example, we used GCash for payment).
- Proceed to NBI Clearance Staff Counter:
Head directly to the NBI Clearance Staff counter and present your NBI Clearance Reference Number and two (2) valid ID.
RELATED READING: WWW.NBI Clearance.GOV.COM.PH Log In
The NBI Clearance Staff will retrieve your NBI Online Application and initiate the processing.
- Undergo Fingerprinting and Photo Capture:
Undergo fingerprinting and photo capture, which includes taking your fingerprints and other biometric data such as a photo, all used to verify your identity.
- Double-Check Information for Correctness:
The NBI Clearance Staff will display all the details you’ve entered and allow you to double-check for any errors or incorrect information.
If you spot any errors, inform the NBI Clearance Staff, and they will make the necessary corrections.
- Initial Quality Control Processing:
Following confirmation of accurate personal information, your application undergoes initial quality control processing.
The NBI Online Services System checks whether you have a “HIT” or “No Hit” record in their database.
A “HIT” signifies “Hits: Identification of Two or More Persons Bearing the Same Name.”
If you have a “HIT,” the NBI Clearance Staff will inform you of the expected release date, which depends on further verification processes.
In the case of a “HIT,” the NBI will need to conduct further verification to confirm your identity, typically taking 10 to 15 working days. During this period, you may be required to provide additional information or documents to resolve discrepancies.
If you don’t have a “HIT,” proceed to the RELEASING SECTION of the NBI Clearance, where you can claim your freshly printed NBI Clearance.
Simply wait for your name to be called, and it will be ready for collection.
Congratulations! You’ve navigated through the entire NBI Clearance process, and your freshly printed NBI Clearance is almost in your hands. Stay with us for the final steps of claiming your document!
Conclusion
In conclusion, our aim has been to serve as your steadfast companion on the journey of obtaining your NBI Clearance Online. We understand that the digital realm can sometimes pose challenges, but fear not – our comprehensive guide is crafted to demystify the process. Your success is our success, and we stand ready to address any concerns or questions you may have. It’s crucial to stay informed, and while we’ve endeavored to provide the latest insights, we encourage you to cross-reference against the most recent guidelines. Remember, your engagement is key – drop us a comment, and let’s navigate any remaining uncertainties together. For those who’ve reached this point, congratulations on your achievements thus far! As you approach the final steps, stay accurate and attentive. Verify your appointment and payment status if you wish, and anticipate the thrill of claiming your freshly printed NBI Clearance. We’re here to celebrate your successes and support you through the culmination of your NBI Clearance Online adventure. Go ahead; the finish line is within reach!
501 thoughts on “NBI Clearance Online: Your Ultimate Guide to Seamless NBI Clearance Online Application!”
Can I claim my NBI clearance without the reference number? I forgot my email and password on my NBI account so I can’t open it. What should I do? Thank you.
Verify pls
I’m work
hello po. change name po kasi anak ko na 4 years old walang unknown sa educational attainment tapos po sa i.d wala pa po psa para sa bagong nem old palang po pwede po b un ipresent? meron po ako brgy certification.pleaae po pa reply. maraming salamat po.
How to apply NBI Clearance Online if I’m a solo parent? Ano ‘yung mga benefits?
Paano kung sobrang tagal dumating ‘yung email for activation? Help naman!
Grabe, ang dami palang steps pero helpful naman. Salamat, online sherpa!
‘Yung friend ko nag-apply last year, ang tagal niyang na-process. Bago na kaya ngayon?
What’s the process if I want to get an NBI Clearance for a family member? Confused pa rin ako!
Can I use a PhilHealth ID as a valid ID for NBI Clearance? Accepted pa ba ‘to?
Paano ba malaman kung na-activate na ‘yung NBI Clearance account? Di ko ma-trace e.
Pwede bang gamitin ‘yung company ID ng parents? Ano ‘yung requirements?
Bes, paano malalaman kung counted ‘yung holiday sa processing days? Confused!
Ano ‘yung pwedeng gamitin na secondary ID para sa NBI Clearance? Hindi kasi ako may driver’s license.
Paano ko malalaman kung qualified ‘yung ID ko for NBI Clearance? Ano ‘yung criteria?
How to apply NBI Clearance Online if I’m an OFW? Ano ‘yung mga specific requirements?
How to apply NBI Clearance Online if I lost my TIN ID? Ano ‘yung mga alternative documents?
Paano ko malalaman kung paano magrenew ng NBI Clearance? Ano ‘yung mga steps?
How to apply for NBI Clearance Online for travel abroad? Ano ‘yung mga requirements?
Ano ‘yung mga common reasons bakit nagkakaroon ng delay sa NBI Clearance release? Worried ako baka ma-late sa appointment ko.
Bes, pwede bang multiple applications sa isang account? Para prepared!
Hello mga ka-NBI! Paano ba mag-apply ng clearance kung hindi alam ang computer? Confused ako!
Kapag nawala ‘yung Confirmation Email, paano i-retrieve? Nakakaloka!
How to apply for NBI Clearance Online kung di ko alam ‘yung current status ng NBI ko? Paano mag-check?
How can I update my contact number in my NBI account? Di ko alam kung paano!
Bes, paano kung laging “Site Unreachable” ang lumalabas sa website? Tips naman diyan!
Kapag may error sa payment, paano ‘yung refund? Confused ako dito.
Kung magre-reschedule, paano ‘yung bayad sa una? Balik ba ‘yun?
Nalilito ako sa step B, paano ko malalaman kung confirmed na ang appointment ko?
How to apply for NBI Clearance Online kung self-employed? Ano ‘yung mga documents na kailangan?
Paano kung nagkaproblema sa payment? Ano ang gagawin ko?
Pwede bang gamitin ‘yung Philhealth ID? Effective ba ‘to?
How to apply for NBI Clearance Online kung OFW? Ano ‘yung mga additional requirements?
Paano kung ma-late ng ilang minutes sa appointment? Sayang ba ‘yun?
Pwede bang gamitin ang marriage certificate as a valid ID for NBI Clearance? Ano ‘yung other options?
Pwede bang bayaran ‘yung NBI Clearance fee sa bank? May iba bang payment options?
Bes, paano ‘pag hindi mo alam ‘yung ID number ng selected ID? Ano gawin?
‘Yung expiration ng OTP, seryoso ba? Kailangan bang mabilisang mag-click dito?
Parang hassle naman ng fingerprinting. Safe ba ‘to?
How to apply NBI Clearance Online kahit walang smartphone? Ano ‘yung options?
What’s the purpose of the reference number in NBI Clearance Online? Hindi ko gets!
Ano ‘yung mga common mistakes na dapat iwasan sa NBI Clearance application? Baka magkaproblema ako!
How to apply NBI Clearance Online for a foreigner? May special requirements ba?
Ano ‘yung mga kailangang documents para sa NBI Clearance renewal? Di ko sure kung kumpleto ako.
How can I update my email address in my NBI Clearance account? Di ko mahanap ‘yung option!
What’s the difference between NBI Clearance and Barangay Clearance? Di ko masyadong ma-gets ‘yung distinction!
Hello mga ka-NBI! Paano kung may hit sa records ko? Any advice?
How can I retrieve my forgotten NBI Clearance password? Di ko ma-recall ‘yung ginamit ko!
How to apply NBI Clearance Online if I lost my transaction reference number? Di ko alam kung paano!
Kapag senior citizen, pwede bang mag-apply online? Any special treatment?
Pwede bang NSO Birth Certificate gamitin as primary ID sa NBI Clearance? Tanggap pa ba ‘to?
Bes, paano malalaman kung successful ‘yung appointment rescheduling? Nakakakaba!
How to apply NBI Clearance Online for a minor? Ano ‘yung requirements?
Bes, paano kung walang email? Hindi kasi techie ‘yung mom ko.
Paano malalaman kung successful ang payment ko using GCash? Ano dapat kong gawin?
Kapag nagbago ‘yung appointment, paano ‘yung existing payment? Balik bayad ba?
Kapag nagkaproblema sa biometrics, anong alternative? Worried na ako!
Bes, paano kung di ko ma-download ‘yung PDF ng NBI Clearance? Panic mode!
Ang daming fees! Bakit may system fee pa? Confusing!
Astig! Kakaiba ‘yung online sherpa term, pero gets ko ang point. Salamat!
How do I change the email address in my NBI Clearance account? Hindi ko ma-edit!
Pwede bang gamitin ‘yung old NBI Clearance sa bagong application? Tanggap pa ba ‘to?
Paano ko gagamitin ang NBI Clearance for local employment? May specific steps ba?
How to apply NBI Clearance Online kahit may na-miss na step? Ma-reretrace pa ba ‘yun?
Kapag walang printer, pwede ba i-email ‘yung clearance sa sarili mo?
Shoutout sa mga solo parents diyan! Ano ‘yung Solo Parent ID, valid ba ‘yun?
Bes, paano ‘pag nagkaproblema sa fingerprinting? May ibang option ba?
Paano malalaman kung need ko ng additional documents sa NBI Clearance application? Help me decide!
How to apply for NBI Clearance Online kung may record ako? Ano ‘yung mga hakbang?
What’s the process for NBI Clearance for visa application? Ano ‘yung mga requirements?
Pwede bang student ID gamitin sa NBI Clearance application? Tanggap pa ba ‘to?
Ano ‘yung mga hakbang pagkatapos i-confirm ‘yung appointment sa NBI Clearance? Ano ‘yung susunod?
Paano malalaman kung approved ‘yung ID na ginamit mo? Ano ‘yung next step?
How to apply NBI Clearance Online kahit walang voter’s ID? Alternative ba?
Hello mga ka-NBI! Paano kung may “Invalid Date of Birth” error? Ano dapat gawin?
Paano ko gagamitin ang NBI Clearance for travel abroad? May steps ba ‘to?
How long does it take to process an NBI Clearance at the branch? Matagal ba ‘to?
Ano ‘yung requirements for NBI Clearance if I’m applying for a government position? Confused ako, guys!
Can I use a police clearance as a valid ID for NBI Clearance? Accepted pa ba ‘to?
‘Yung step 3 parang napakabigat sa bulsa, paano kung walang budget?
How to apply for NBI Clearance Online kung may dual citizenship? Ano ‘yung mga requirements?
How to apply for NBI Clearance Online kung walang TIN? May ibang IDs ba na pwedeng substitute?
How to apply NBI Clearance Online if I’m a student? Ano ‘yung mga student-friendly requirements?
Bes, paano kung may sabit ka sa past na kaso? I-sshare ba ‘to sa clearance?
Kapag late na ‘yung confirmation email, paano ‘yung appointment? Apektado ba?
Kung wala kang valid ID, pwede ba ‘yung police clearance na lang?
How to apply NBI Clearance Online if I’m a solo parent? Ano ‘yung mga specific requirements?
Pwede bang gamitin ang TIN ID for NBI Clearance application? Accepted pa ba ‘to?
Bes, paano kung wala kang valid ID na listed? Desperate mode na ako!
Ano ang proseso pag magkaiba ‘yung middle name sa NSO at sa valid ID ko? Confusing ‘to, guys!
Bes, paano kung expired ‘yung passport ko? Ano ‘yung alternative ID na pwedeng gamitin?
Pwede bang gamitin ang old NBI Clearance as a valid ID for a new application? Accepted pa ba ‘to?
Pwede bang mag-apply kahit walang appointment? Feeling ko may shortcut eh!
Hello mga ka-NBI! Pwede bang magdala ng chika habang nag-aapply? Haha!
Ano ‘yung mga documents na kailangan kung mag-aapply ako for travel abroad? Gusto ko makuha agad ‘to!
What’s the purpose ng captcha sa NBI Clearance Online registration? May function ba ‘to?
How to apply for NBI Clearance Online kung may kapangalan ako? Ano ‘yung mga additional requirements?
Ang saya ng article na ‘to, feeling ko expert na ako sa NBI Clearance Online!
Hello mga ka-NBI! Pwede bang maging taga-refer ng friends? Haha!
Kapag nag-“System Upgrade,” paano ‘yung mga pending applications? Affected ba?
Paano ko malalaman kung may “hit” ang pangalan ko? Any insights, bes?
How do I change the mobile number in my NBI Clearance account? Hindi ko ma-update!
Pwede bang magpa-resched ng appointment? May emergency eh!
May bayad ba ‘yung QR code? Hindi ko alam kung paano mag-scan eh.
Pwede bang magdala ng expired passport as valid ID sa NBI Clearance? Tanggap pa ba ‘to?
Hello mga ka-NBI! Paano kung gusto ko mauna sa appointment date? May way ba?
Grabe, daming steps! Sana may shortcut, haha!
Paano palitan ‘yung mobile number sa NBI Clearance account? Hindi ko mahanap ‘yung option!
Pano gagamitin ‘yung NBI Clearance for local employment? Ano ‘yung mga steps?
Pwede bang mag-apply kahit walang appointment sa NBI Clearance center? Feeling ko hassle mag-schedule!
Bes, may bayad pa ba ‘to kahit naka-schedule na?
How can I recover my account if I forgot my password? Parang alaws na ako dito!
Ano ‘yung purpose ng appointment code sa NBI Clearance? Di ko alam kung saan gamitin!
How to apply NBI Clearance Online if I changed my address? Ano ‘yung mga steps?
Pwede bang itago ‘yung NBI Clearance sa wallet or kailangan laging dala?
Can I get an NBI Clearance even if I’m a minor? Paano ‘yung process?
Ano ‘yung “Hits: Identification of Two or More Persons Bearing the Same Name”? Nakakatakot naman ‘to!
How to apply NBI Clearance Online kahit baguhan sa digital world? Kinakabahan ako!
Alam mo ba kung anong oras bukas ang NBI Clearance branch? Hindi ko mahanap online eh.
Pwede bang gamitin ang voter’s ID for NBI Clearance application? Valid pa ba ‘to?
Paano kung may discrepancy sa middle name sa valid ID at application form? Help!
Bes, paano kung may double payment? May refund ba ‘to or saklap na ‘to?
Hello mga ka-NBI! Ano ‘yung secret ng mabilisang appointment? Share naman!
Bes, paano malalaman kung qualified ka for the “Senior Citizen” discount? Lakihan mo naman!
Bes, paano kung nawalan ako ng load habang nasa gitna ng application? Help!
Pwede bang multiple appointments? Para sigurado lang!
Nalito ako sa step 3, pwede bang magbigay ng konting clarification? Tagalized version, please!
Kapag walang email, pwede bang gamitin ‘yung email ng friend ko? Share naman!
Hello mga ka-NBI! Paano kung nawala ‘yung online session sa kalahati ng process? Ano ‘yung gagawin?
How to apply NBI Clearance Online kahit walang TIN ID? Ano alternative?
Pwede bang bayaran ang NBI Clearance fee online? Para iwas pila sa center.
Paano kung wala kang valid ID na nasa list? Desperate mode na ako!
Pwede bang mag-apply kahit walang online appointment sa NBI Clearance center? Baka pwede walk-in na lang.
Kapag wala pang appointment, pwede bang mag-apply agad? Excited lang!
Pwede bang gamitin ‘yung PhilHealth ID for NBI Clearance? Accepted pa ba ‘to?
How to apply for NBI Clearance Online kung nagbago ‘yung address? Ano ‘yung mga hakbang?
How can I change my appointment schedule if something urgent came up? Ano ‘yung steps?
Bes, paano kung mali ‘yung nailagay sa form? Wala bang undo button?
Bes, paano kung expired ‘yung ID gamit mo? Pwede bang ipa-renew agad?
Kapag walang access sa GCash, ano ‘yung Plan B? Help naman!
What’s the purpose of the appointment reference number sa NBI Clearance? May function ba ‘to?
Paano ako makakasiguro na secure ‘yung personal info ko sa NBI Clearance? Ano ‘yung privacy measures?
Bes, paano malalaman kung na-approve ‘yung ID na ginamit mo? Excited na ‘ko!
Bes, paano malalaman ‘yung result ng background check? Excited na ako!
How to apply NBI Clearance Online if I have a change of gender? May special requirements ba?
How can I inquire about the NBI Clearance fees for 2024? Di ko mahanap ‘yung breakdown!
Sana may tutorial na video para mas clear. Hirap intindihin minsan ‘pag text lang.
Bes, paano kung gusto ko i-edit ‘yung appointment date? Pwede ba ‘yun?
Pwedeng ba mag-apply kahit walang appointment sa NBI Clearance center? Parang hassle mag-schedule!
Ano ‘yung process kung magkaiba ‘yung address sa valid ID at application form? Pahelp naman!
Pwede bang magdala ng NSO Birth Certificate as a primary ID for NBI Clearance? Accepted pa ba ‘to?
Hello mga ka-NBI! Pwede bang maging NBI Clearance ambassador? Haha!
How to apply NBI Clearance Online kahit may ginagamit kang VPN? Affect ba ‘yung process?
How long does it take for the “hit” status to be cleared? Matagal ba ‘to?
Pwede bang kumuha ng NBI Clearance Online for a relative? Ano ‘yung process?
How to apply NBI Clearance Online kahit nawala ‘yung reference number? Possible ba i-retrieve?
Pwede bang sabay-sabay ang fingerprinting ng buong pamilya? Para tipid!
Hello mga ka-NBI! Paano kung gusto mo i-cancel ‘yung appointment? Possible ba ‘yun?
How to apply NBI Clearance Online if I’m a fresh graduate? Ano ‘yung mga requirements?
Pwede bang half-day lang ang appointment? Busy kasi sa work eh.
Ano ‘yung mga dapat gawin kung nawala ‘yung NBI Clearance reference number? Paano macheck ang status?
Paano kumuha ng NBI Clearance Online kung walang permanenteng address? May ibang paraan ba?
How to apply NBI Clearance Online kahit wala kang email? Pwede bang gamitin ‘yung sa friend mo?
What’s the difference between a valid ID and a primary ID for NBI Clearance Online? Confused ako, guys!
Nakakaloka, kailangan ba talaga magbayad agad para maging confirmed ang appointment?
Ano ‘yung mga pwedeng gawin kung hindi ako makapunta sa scheduled appointment for NBI Clearance? May reschedule ba?
What’s the difference between a hit and no hit in NBI Clearance processing? Confused ako!
Ang dami palang valid IDs na pwede gamitin! Anong pinaka-okay na gamitin dito?
How to apply for NBI Clearance Online kung unemployed? Ano ‘yung mga alternative documents na pwedeng ipresent?
How to apply NBI Clearance Online kahit may alias? I-sshare ba ‘yun sa clearance?
Bes, paano kung nawala ‘yung reference number ng payment? Panic na ako!
Can I get an NBI Clearance even if I have an existing criminal case? Ano ‘yung process?
Paano ba malalaman kung success ang NBI Clearance Online application ko? Iniisip ko baka may mali ako sa process.
Paano malalaman ‘yung available na appointment slots sa NBI Clearance? Di ko mahanap!
How can I check the validity of my NBI Clearance? Di ko sure kung updated pa ‘to!
Paano ko gagamitin ‘yung NBI Clearance for local employment? Ano ‘yung mga specific steps?
What’s the difference between the NBI Clearance and Barangay Clearance? Di ko ma-distinguish!
How to apply for NBI Clearance Online kung walang middle name? Pwedeng ba ‘yon?
Bes, kahit ba expired ‘yung passport, pwede pa rin gamitin as ID?
How to apply NBI Clearance Online kahit may kapangalan? Medyo kinakabahan ako.
Paano ko gagamitin ang NBI Clearance for employment purposes? May special requirements ba?
Can I use a company ID for NBI Clearance Online application? May idea ba kayo?
Pwede bang magdala ng secondary ID na walang picture for NBI Clearance? Confused ako, guys!
Ano kaya ‘yung “Auto Validated” sa status ng payment? Any idea?
How can I correct a typo in my application form? Hindi ko mahanap ‘yung edit button!
How to apply NBI Clearance Online kahit hindi marunong mag-computer? Kayang-kaya ba?
Pwede bang ipa-rush ‘yung processing? May urgent matter kasi ako.
Hello sa lahat! May tips ba kayo para maging mabilis ang application process?
Paano ko malalaman kung valid ‘yung NBI Clearance reference number ko? Di ko sure!
Bes, paano kung gusto ko i-update ‘yung contact number ko? Ano ‘yung steps?
How to apply for NBI Clearance Online for government employees? May mga special steps ba?
Bes, may age limit ba sa senior citizen ID? Feeling ko pwede pa ako mag-apply!
How to apply for NBI Clearance Online kung may pending case? Ano ‘yung mga kailangan na dokumento?
How to apply for NBI Clearance Online for a seaman? Ano ‘yung mga specific requirements?
Bes, pwede bang walang appointment? Walk-in lang ganun?
Kapag nagka-error sa payment, pwede bang mabalik ang pera? Scary ‘to!
Paano malalaman kung counted ang holiday sa processing days? Alam mo ba ‘to?
Hello mga ka-NBI! Paano kung may incorrect gender na nailagay sa application? Kaloka ‘to!
Kapag di natanggap ‘yung application, pwede ba ulit mag-apply agad?
How to apply NBI Clearance Online kahit nasa probinsya? Possible ba ‘yun?
Paano kung di makapunta sa scheduled appointment? Balik bayad ba ‘yun?
How can I add a representative for my NBI Clearance application? Ano ‘yung steps?
Kapag walang email, pwede bang gamitin ‘yung email ng friend? Share naman!
Gaano katagal bago marelease ‘yung NBI Clearance after processing? Di ko sure sa timeline!
Paano malalaman ‘yung release date ng clearance? Excited na ‘ko!
How to apply NBI Clearance Online kahit may pending case? I-sshare ba ‘yun sa NBI?
Ano ang inyong masasabi tungkol sa NSO Birth Certificate? Effective ba ‘to na valid ID?
Bes, paano malalaman kung nablock ‘yung email ng NBI? Hindi ko makita.
Ano ‘yung mga steps kung may discrepancy sa surname sa valid ID at application form? Help a friend out!
Paano malalaman ‘yung result ng background check? Excited na ako!
Bes, hindi ko na-gets ‘yung confirmation email. Ano bang dapat kong gawin?
Ano ‘yung difference ng NBI Clearance at Police Clearance? Confused ako!
Can I use a barangay clearance as a valid ID for NBI Clearance? Accepted pa ba ‘to?
Hello mga online experts! Ano ang gamit n’yo na valid ID? Share naman diyan!
How to apply for NBI Clearance Online kung menor de edad? Ano ‘yung mga specific na requirements?
Paano ko malalaman ‘yung expiration date ng NBI Clearance? Hanggang kailan valid?
How to apply for NBI Clearance Online kung hindi pa 18 years old? Ano ‘yung mga requirements?
How to apply for NBI Clearance Online kung foreigner working sa Pilipinas? Ano ‘yung mga hakbang?
Hello mga ka-NBI! Paano kung may duda ka sa validity ng ID mo? Sumbong ba agad?
Ano ‘yung mga possible reasons kung bakit na-reject ‘yung NBI Clearance application? Iniwasan ko sana ‘to!
How to apply for NBI Clearance Online kung may hit ako sa record ko? Ano ‘yung mga next steps?
Can I use a voter’s ID for NBI Clearance if it’s not yet laminated? Accepted pa ba ‘to?
‘Yung process sa pagbayad, medyo mabilis lang ba siya? Excited na ‘ko!
Hello mga ka-NBI! Ano ‘yung process kapag may HIT? Scary ‘to!
How to apply NBI Clearance Online kahit may kapangalan? Paano maiiwasan ‘yung confusion?
Paano malalaman ‘yung requirements kung estudyante at kailangan ng NBI Clearance? Di ko alam!
Hello, mga expert dyan! May suggestion ba kayo kung alin ang pinakamabilis na payment option?
Bes, pwede bang magdala ng snacks habang nag-aapply? Haha!
Ano ‘yung kasunod pagkatapos ng fingerprinting and photo capture sa NBI Clearance processing? Medyo nalilito ako, guys!
How to apply NBI Clearance Online if I lost my reference number? Panic mode na ako, guys!
What’s the difference between the NBI Clearance and police clearance? Confused ako, guys!
How to apply NBI Clearance Online if I lost my email confirmation? Ano ‘yung gagawin ko?
How to retrieve forgotten NBI Clearance password? Di ko maalala ‘yung ginamit ko!
Bes, paano malalaman kung confirmed na ang appointment? Walang confirmation email eh.
Ano ‘yung confirmation message sa payment? Hindi ko ma-gets, eh.
Ano ‘yung mga reasons for NBI Clearance rejection? Para maiwasan ko ‘to!
Paano malalaman ‘yung expiration date ng NBI Clearance? Hanggang kailan valid?
Paano ko malalaman kung pwede na i-claim ‘yung NBI Clearance ko? Ano ‘yung mga status na dapat i-check?
Bes, ano ‘yung recommended na time mag-apply? May peak hours ba?
Ano ‘yung kasunod pagkatapos i-confirm ‘yung appointment sa NBI Clearance? Ano ‘yung next steps?
Paano ko malalaman kung available na ang NBI Clearance for claiming? Ano ‘yung mga status na dapat i-check?
How to inquire about NBI Clearance fees for 2024? Sana updated ‘yung rates.
How to apply NBI Clearance Online if I don’t have a middle name? Ano ‘yung alternative?
Sana may hotline na pwedeng itawag kapag nagkaproblema sa application.
Ano ang mga special discounts for senior citizens sa NBI Clearance? Pa-explain naman!
Saan makikita ‘yung list ng valid IDs na pwedeng gamitin? Help a friend out, please!
Hello mga ka-NBI! Paano kung mawalan ng internet connection sa gitna ng application? Kaloka!
May age limit ba sa student ID? Feeling ko hindi ako matatanggap. Haha!
How to apply NBI Clearance Online if I’m a senior citizen? Ano ‘yung mga specific requirements?
Paano ko malalaman ‘yung specific requirements kung mag-aapply ako for government position? Di ko sure kung same lang sa private.
How to apply NBI Clearance Online kahit may overdue unpaid balance sa previous clearance? Panic mode!
What’s the fastest way to settle an “invalid” appointment issue? Di ko alam kung paano!
Hello mga ka-NBI! Pwede bang magpa-pic ‘pag nasa branch na? Haha!
How to apply for NBI Clearance Online kung OFW? May mga additional requirements ba?
Pwede bang virtual hug sa mga naguguluhan? Haha!
Bes, may age limit ba ang NSO Birth Certificate? Feeling ko expired na ‘to!
Saan ako makakita ng breakdown ng fees sa NBI Clearance? Di ko makita sa site!
How do I correct the wrong information on my NBI Clearance after processing? Help a friend out!
How to apply NBI Clearance Online if I’m a minor? Ano ‘yung mga specific requirements?
How much ‘yung total na babayaran? Confused ako sa breakdown.
Hello mga ka-NBI! Paano kung may error sa middle name? Pwede bang irevise ‘yan?
Kapag nag-reapply, paano ‘yung existing payment? Magiging refundable ba ‘yun?
Pwede ba ‘yung digital na voter’s ID? May nakatry na ba dito?
Bes, paano malalaman kung updated ‘yung guidelines? May latest ba?
May mga naka-try na bang gamitin ang passport as ID? Effective ba siya?
How to apply NBI Clearance Online kahit nasa ibang bansa? May special steps ba?
Paano gagamitin ‘yung NBI Clearance for travel abroad? Ano ‘yung mga requirements?
Hello mga ka-NBI! Ano ‘yung requirements para sa Seaman’s Book? May alam ba dito?
How to apply NBI Clearance Online kahit hindi marunong mag-English? Pwedeng ba ‘yun?
Can I use a birth certificate as a valid ID? Kasi wala akong ibang IDs, guys!
Hello mga ka-NBI! Ano ‘yung “System Fee”? May sense ba ‘yung additional na bayad?
Bes, paano kung expired na ‘yung ID ko? Pwede bang photocopy muna?
Pwedeng ba ‘yung company ID gamitin kahit walang logo? Tagalized version nga!
Ano ang mga documents na kailangan dalhin sa NBI branch for processing? Di ko alam, guys!
Pwede bang mag-apply kahit walang ID? Feeling ko mas mabilis ‘pag walk-in eh!
Paano ko ma-access ‘yung Transactions page para i-check ‘yung status ng appointment ko? Di ko mahanap!
Sana may emoji na pwedeng gamitin sa comments para mas masaya!
How to apply NBI Clearance Online kahit OFW? May special steps ba?
‘Yung friend ko, nag-apply siya dati pero ang tagal ng process. May mabilis na bang way ngayon?
Grabe, nakakabigla ang HIT! Bakit may ganun?!
Kapag “Payment Failed” sa credit card, paano ‘yung next steps? Help!
Hello mga ka-NBI! Paano kung gusto ko i-change ‘yung preferred branch? May way ba?
Can I use a student ID for NBI Clearance application? Accepted pa ba ‘to?
Hi guys! How can I track the status of my NBI Clearance Online application? Nakakaexcite!
Hello, mga ka-NBI! Kaya ba ‘to in one day lang? Excited na ‘ko!
Bes, pwede bang isabay ‘yung fingerprinting ng buong pamilya? Para tipid!
Paano ko malalaman kung may problema sa NBI Clearance payment ko? Medyo nagdududa ako sa transaction.
Kapag may kaparehas ka ng pangalan, paano malalaman kung ikaw ‘yun? Nakakatakot naman ‘to!
Bes, paano ‘pag nawala ‘yung appointment code? Panic mode na ako!
Pano ko ba i-che-check kung activated na ‘yung account ko sa NBI Clearance? Di ko makita ‘yung confirmation e.
Hello mga ka-NBI! Pwedeng bang dala na lang ‘yung reference number sa appointment? Hassle kasi.
Ano ‘yung ibig sabihin ng “Auto Validated” sa GCash payment? Ok lang ba ‘yon?
Paano kung hindi mo alam ‘yung ID number ng selected ID? Ano gawin?
How to apply for NBI Clearance Online kung senior citizen? Ano ‘yung mga specific requirements?
How to apply NBI Clearance Online for a foreigner residing in the Philippines? Ano ‘yung mga steps?
Bes, paano kung nag-move ‘yung appointment, panong process?
Paano malalaman kung accepted ‘yung payment? Wala akong natanggap na confirmation.
Bes, paano kung may problema sa appointment date? Pwede bang i-reschedule?
How to apply for NBI Clearance Online kung di pa ako nagtatrabaho? Ano ‘yung mga proof of identity na pwede?
Bes, kailangan ba ng supporting documents kung solo parent? Ano mga ‘yun?
How to apply for NBI Clearance Online kung solo parent? Ano ‘yung mga specific requirements?
How to apply for NBI Clearance Online kung may hit sa record? Ano ‘yung mga next steps?
Paano ko malalaman kung validated ‘yung GCash payment ko? Di ko makita sa app!
How can I cancel my appointment if something urgent came up? Need help, please!
How to apply NBI Clearance Online if I changed my name? Ano ‘yung mga steps?
How to apply NBI Clearance Online kahit walang TIN ID? Pwedeng ba ‘yun?
How to apply NBI Clearance Online kung OFW? Ano ‘yung specific requirements?
How to apply NBI Clearance Online pag hindi marunong mag-computer? Struggle ‘to!
Bes, pwede bang surprise drug test ‘to? Haha!
How do I make sure my NBI Clearance payment is legit? Baka ma-scam ako!
How long does it take to receive the activation email after registration? Tagal na wala eh!
Ano ‘yung purpose ng pag-fill out ng applicant information form sa NBI Clearance? Confused ako!
How to apply for NBI Clearance Online kung wala akong printer? Saan ako kukuha ng printed form?
Paano ko gagamitin ‘yung NBI Clearance for travel abroad? Ano ‘yung mga requirements?
Bes, paano kung mag-apply ako, tapos biglang nagka-system down? Paano na ‘yun?
Ano ‘yung process kung may discrepancy sa address sa valid ID at application form? Help me out!
Hello mga ka-NBI! Paano kung gusto ko i-verify ‘yung status ng application ko? Any tips?
Bes, paano kung nawala ‘yung screenshot ng payment receipt? Paano i-retrieve?
Bes, paano ‘pag nagsara ‘yung website habang nag-aapply? Ano next?
Hello mga ka-NBI! Ano ‘yung secret para mabilisang verification ng ID? Share naman!
What to do if I missed my scheduled appointment? Di ako sure sa next steps!
How to apply NBI Clearance Online kahit walang email? May ibang paraan ba ng communication?
Kapag walang GCash, paano magbayad? Ano alternatives?
Paano ko malalaman kung available pa ‘yung appointment slots for NBI Clearance? Di ko mahanap!
How to apply NBI Clearance Online if I have a criminal record? Ano ‘yung mga steps?
How can I change my personal information in the NBI Clearance application? Need ko ng help!
Ano nga bang silbi ng reference number sa NBI Clearance Online? Di ko masyadong na-gets ‘yung part na ‘yun.
Paano ko i-correct ‘yung maling information sa NBI Clearance ko after processing? Tulong naman diyan!
Ano ‘yung mga valid IDs na puwedeng gamitin para sa NBI Clearance application? Kasi wala akong passport e.
Ang haba ng pila sa branch, may VIP pass ba ‘to? Charot lang!
How to appeal NBI Clearance rejection? May chance pa ba ko kung na-deny?
Bes, paano kung wrong spelling ‘yung nailagay sa application? Editable ba?
Paano kung may kaparehas ka ng pangalan, paano malalaman kung ikaw ‘yun?
What’s the procedure if I want to reschedule my appointment? May steps ba ‘to?
Paano ko malalaman ‘yung requirements kung OFW ako at kailangan ko ng NBI Clearance? Di ko alam!
Ano ang mga requirements kung gusto ko magpa-rush ng NBI Clearance? Ano ‘yung fee?
Ano ‘yung ibig sabihin ng “HIT” sa NBI Clearance? May impact ba ‘to sa application?
Pwede bang secondary ID na walang litrato for NBI Clearance? Medyo nalilito ako, guys!
How to apply NBI Clearance Online for business permit requirements? Ano ‘yung mga needed documents?
Hello mga ka-NBI! May discount ba kapag birthday mo? Haha!
Bes, paano ‘pag late dumating sa scheduled appointment? Baka ma-cancel!
Bes, paano kung nagka-typo sa address? May remedyo ba ‘to?
Bes, paano kung di ko ma-contact ‘yung NBI hotline? Ano ‘yung ibang options?
Hello mga ka-NBI! Ano ‘yung pinaka-common na mistake sa application? Avoidable ba?
Pano ko malalaman ‘yung requirements kung OFW ako at kailangan ko ng NBI Clearance? Di ko alam!
Paano kung may nagsusumbong sayo sa NBI? Scary naman ‘to!
Pwede bang terno ‘yung NBI Clearance sa OOTD? Char lang!
Kapag gusto ko magpa-rush, paano ‘yung process? May additional fee ba?
How to check if my NBI Clearance is ready for release? Excited na ako kunin ‘to!
Paano kung nawala ‘yung appointment code? Panic mode na ako!
Bes, pwede bang gamitin ‘yung driver’s license kahit expired na? Desperate na!
How to apply NBI Clearance Online for dummies, pwede ba ‘yung ganun na title next time? Haha!
Kapag may “Pending” status ang appointment, ano ‘yung next step? Help!
Kapag “Site Not Secure” ang lumabas, paano i-ensure ‘yung safety ng info ko?
How to make sure na tama ‘yung details na nasa NBI Clearance ko? Baka may mali sa spelling.
Ano ‘yung next step pagkatapos ng fingerprinting and photo capture sa NBI Clearance processing? Confused ako, guys!
Napaka-informative! Pero paano kung nagbago ang rules sa 2024?
Hello mga ka-NBI! Paano kung may typographical error sa name ko? Nakakaloka!
Ano ‘yung difference ng NBI Clearance at Postal ID? Confusing naman!
Bes, pwede bang humingi ng extension sa payment? May extra charge ba?
Hello mga ka-NBI! Paano kung mali ‘yung nailagay ko sa “Occupation”? Pwede bang baguhin?
Paano malalaman kung may discount? Student ako, kaya dapat may discount, ‘di ba?
Pwede bang photocopied ang valid ID? Para di masayang ‘yung orig.
Bes, paano ‘pag na-hack ‘yung account? Worried ako baka mawala lahat.
Grabe, paano ba malalaman kung legit ‘yung NBI Clearance payment na ginawa ko? Baka ma-scam ako, kinakabahan ako dito!
Ano ‘yung validity ng NBI Clearance for travel? Kailangan ba laging updated?
Can I use a company ID with an expired ID picture for NBI Clearance? Ano ‘yung rules?
How to apply NBI Clearance Online if I don’t have a permanent address? Ano ‘yung alternatives?
How to apply NBI Clearance Online kahit walang appointment? Pwede bang walk-in?
Paano ba mag-check ng NBI Clearance schedule sa website? Di ko mahanap ‘yung link.
Hello mga ka-NBI! Paano kung may technical glitch habang nag-aapply? Nakakastress!
How to apply NBI Clearance Online kahit walang smartphone? Ano ‘yung alternatives?
Kapag student, pwede bang school ID lang ang gamitin? Ano kailangan?
How can I correct a mistake in my NBI Clearance application after submission? Help a friend out!
Pano ko ba ma-check ‘yung status ng NBI Clearance application ko online? Parang nawawala e!
Paano malalaman kung pwede ang NBI Clearance sa ibang bansa?
Paano ko malalaman kung activated na ‘yung NBI Clearance account ko? Di ko mahanap ‘yung confirmation!
Paano ko i-rereschedule ang appointment kung may conflict sa schedule? Help me decide!
Paano palitan ‘yung email address sa NBI Clearance account? Hindi ko mahanap ‘yung option!
How to apply NBI Clearance Online if I don’t have a valid ID yet? Ano ‘yung mga alternative documents?
How to apply NBI Clearance Online kahit minor pa? Pwedeng ba?
How to apply NBI Clearance Online pag walang valid ID? Ano ang alternative?
How to apply NBI Clearance Online if I’m currently abroad? Ano ‘yung steps?
How to apply NBI Clearance Online if I have a pending application from the previous year? Ano ‘yung steps?
Kapag may “Failed Payment” sa GCash, paano i-retry? Nakakapraning!
Paano ba i-update ‘yung profile information sa NBI Clearance account? Medyo outdated na kasi ‘yung address ko.
What’s the purpose of the captcha sa NBI Clearance Online registration? May function ba ‘to?
How to apply NBI Clearance Online kung baguhan sa digital world? Kinakabahan ako!
How to apply for NBI Clearance Online kung may hit ako sa record? Ano ‘yung mga next steps?
Can I use a barangay ID for NBI Clearance Online? Effective pa ba ‘to?
Can I get NBI Clearance even if I’m unemployed? Ano ‘yung mga proof of income na pwede?
How to avoid delays sa NBI Clearance release? Medyo busy kasi ako, ayaw ko ng hassle.
What’s the process if I want to get NBI Clearance for visa application? Ano ‘yung mga requirements?
How to apply NBI Clearance Online if I don’t have a middle name on my ID? May alternative ba?
Pwede bang mag-apply kahit walang trabaho? Ano ‘yung mga proof of income na pwede?
Hello sa lahat ng nag-comment! Anong advice niyo sa mga first-timers dito?
Pwede bang mag-walk in kahit may appointment? I’m not sure, guys!
How long does it take for the NBI Clearance to be released after processing? Di ko sure ‘yung timeline!
Ano ‘yung mga steps pagkatapos ma-confirm ‘yung appointment for NBI Clearance? Ano susunod na gawin?
Ano ‘yung mga additional requirements para sa NBI Clearance ng minor? Di ko alam kung kasama sa listahan.
Kapag walang printer, paano ‘yung online application? May ibang option ba?
‘Yung friend ko, di pa rin nakakarecover ng account. Pwede ba ‘yung hotline?
Bes, paano kung wala akong valid ID? May ibang alternative ba na pwedeng gamitin?
How to apply for NBI Clearance Online kung nawala email confirmation? Ano ‘yung dapat gawin?
Pano malalaman ‘yung expiration date ng NBI Clearance? Hanggang kailan valid?
Okay ba talaga gamitin ang GCash? Hindi kasi ako techie masyado.
Bes, walang kasiguraduhan na tama ang nailagay ko sa form. Nakakapraning!
Bes, pwede bang mag-apply para sa ibang tao? Hindi kasi marunong ‘yung kapatid ko.
Kapag nag-resched, pwede bang i-maintain ‘yung payment? Sayang kasi eh.
Pwede bang gamitin ang postal ID for NBI Clearance application? Accepted pa ba ‘to?
Paano kung wala kang valid ID na pangalan mo lang ang nandun? Desperate mode!
Magkano ‘yung fee sa NBI Clearance? Hindi ko alam kung paano babayaran ‘to eh.
Bakit parang may extra step ‘yung optional? May advantage ba ‘yun?
Hello mga ka-NBI! Paano ba mag-apply kung laging “Fully Booked” ang slots?
Pwede bang magdala ng expired passport as a valid ID for NBI Clearance? Accepted pa ba ‘to?
Hindi ko gets kung paano ko malalaman ‘yung available dates para sa appointment.
What’s the process if I want to get NBI Clearance for migration purposes? Ano ‘yung mga requirements?
Kaya ko kaya ‘to in one sitting? Feeling ko ang tagal!
Bes, baka pwede pa-share ng GCash referral code? Tara, paregister!
Bes, bakit may auto-correct sa name pag nag-fill out ng form? Nakakalito!
Kapag may “Appointment Conflict,” paano ‘yung resolution? Nakakalito!
Hello, mga ka-NBI Clearance Online! Sino pa diyan naguluhan sa step 2?
Bes, paano ‘pag hindi kumpleto ‘yung biometrics? Ano ‘yung consequences?
What’s the process if I want to get NBI Clearance for business permit requirements? Ano ‘yung mga needed documents?
Ano ang mga reasons bakit maaaring ma-deny ang NBI Clearance application? Confused ako!
How to apply NBI Clearance Online if I have a hit in my record? Confused ako, guys!
How to apply for NBI Clearance Online kung housewife? Ano ‘yung mga required documents?
How can I check my NBI Clearance payment status? Di ko makita sa site!
How to apply NBI Clearance Online kahit walang appointment? Posible ba ‘to?
How to apply NBI Clearance Online without smartphone? Possible ba ‘yun?
Kapag expired ‘yung valid ID, pwede pa rin bang gamitin? Ano ‘yung rules?
Pwede bang gamitin ang NBI Clearance as a valid ID for other transactions? Confused ako, guys!
Kapag may HIT, may problema ba sa records ko? Kinakabahan ako bigla!
What’s the process if my payment failed using Paymaya? Panic mode na ako!
Sana may kasamang free coffee ‘yung sa NBI branch. Haha!
Ano ‘yung mga common mistakes ng applicants sa NBI Clearance? Ayoko sana magkamali.
Pwede bang magdala ng authorization letter sa pag-claim ng NBI Clearance? Effective ba ‘to?
Ano ‘yung additional requirements para sa Seaman’s Book? May alam ba dito?
Bes, paano kung gusto ko i-check ‘yung history ng transactions ko? Saan makikita ‘yun?
Ano ang validity period ng NBI Clearance? Hindi ko sure kung hanggang kailan pwede gamitin.
Paano ko malalaman kung available pa ‘yung preferred appointment schedule ko? Di ko mahanap!
Ano ba ‘yung pag-claim ng NBI Clearance, madali lang ba? Excited na ako!
Pwede bang gamitin ‘yung NBI Clearance for loan application? May mga banks kasi na humihingi ng ganito.
Paano ko malalaman ‘yung requirements kung student ako at kailangan ko ng NBI Clearance? Di ko alam!
Para saan ‘yung optional step? May benefits ba ‘pag ginawa ko siya?
Paano malalaman kung may error sa application form? Nakakakaba naman!
Kapag nag-“Processing” ang status ng matagal, ano ang dapat gawin? Nakakainip!
Bes, anong feeling ng may HIT? Kinakabahan ako bigla!
Paano ko ma-check ‘yung status ng NBI Clearance application ko online? Di ko mahanap!
Bes, kahit OFW ka, pwede pa rin ba mag-apply online? Share your experience!
Bes, paano kung walang credit card, paano magbayad online? Help!
How to apply for NBI Clearance Online kung student pa lang ako? May kailangan bang specific na ID?
Paano malalaman kung approved na ‘yung application? Excited na ako!
Alam mo ba kung anong NBI branch ang pinakamabilis ang processing?
Paano ko gagamitin ang NBI Clearance for international travel? Ano ‘yung mga requirements?
Paano ba mag-book ng appointment for NBI Clearance sa mobile? Di ko alam kung saan pupunta.
Kapag OFW, pwede bang humingi ng tulong sa consulate? May specific process ba ‘to?
What to do if I didn’t receive the OTP within 5 minutes? Kaka-register ko lang eh!
Paano ko malalaman kung available na ang NBI Clearance for claiming? Gusto ko sana agad makuha!
How to apply NBI Clearance Online if I have a hit on my record? Ano ‘yung mga susunod na hakbang?
Paano ko malalaman kung valid pa ‘yung ID ko for NBI Clearance application? Ano ‘yung expiration?
How to apply NBI Clearance Online if I don’t have a printer for the application form? Help me out!
Grabe, ang dali pala ng NBI Clearance Online kapag sinundan mo ‘tong guide na ‘to!
Sana may option na cash lang, wala kasi akong GCash or Paymaya. Ano gagawin ko?
Pwedeng ba ‘yung TIN ID lang gamitin, okay na ba ‘yun?
How to apply NBI Clearance Online kahit senior citizen? Ano ‘yung mga special benefits?
Hello mga ka-NBI! Paano kung gusto mo ma-claim ‘yung NBI Clearance ng friend mo? Possible ba?
How to apply NBI Clearance Online if I don’t have a permanent address? Paano ‘to?
How to inquire about NBI Clearance fees for 2024? Di ko makita ‘yung breakdown!
Pwede bang TIN ID gamitin sa NBI Clearance application? Keri pa ba ‘to?
How to apply NBI Clearance Online ba dapat ang title? Confused lang ako, haha!
Bes, paano kung nakalimutan kong i-save ‘yung filled-out form? Panic mode!
Paano ko malalaman ‘yung requirements kung mag-aapply ako for local employment? Ano ‘yung mga need ko dalhin?
What’s the process for NBI Clearance for business permit requirements? Ano ‘yung mga required documents?
Hello mga ka-NBI! Paano kung ayaw mag-load ng appointment page? Ano ang solution?
Paano ko malalaman ‘yung expiration date ng NBI Clearance ko? Ano ‘yung validity?
Kapag nagbago ‘yung schedule, paano ‘yung appointment? Balik bayad ba?
Kapag may “System Error” sa payment, paano i-aaddress ‘yun? Nakakakaba!
Hello, NBI Clearance experts! Ano mas maganda, morning or afternoon appointment?
Bes, paano kung gusto ko mag-apply for a family member? Ano ‘yung requirements?
What should I do if I entered the wrong birthdate in my application? Nakakaloka!
How to apply NBI Clearance Online kahit senior citizen? Any special treatment?
How to apply NBI Clearance Online if I’m a housewife? Ano ‘yung mga required documents?
Ang gulo ng website, paano mag-log out? Haha!
Bes, ano ‘yung “System Fee”? May sense ba ‘yung additional na bayad?
‘Yung NBI branch sa kanto lang, okay na ba ‘yun o mas maganda sa malaking mall?
Paano ko malalaman kung may “HIT” ako sa records? Kinakabahan ako bigla!
I want claim NBI certificate
Thanks
Thanks
How to appointment of NBI clearance
Renewal nbi
Paano po mag appointment ng NBI??MAAM SIR??
Gerald an NBI registration