NBI Online — Looking for a tutorial/guide on how to apply NBI online? With this blog, applying for your NBI Online has never been that easy.
As we all know, one of our requirements when applying for a job is to have a clear NBI record (no derogatory record). We’ll make it really easy for you and help guide you along the NBI Online process. It is now easier for the public to apply, renew or check their status with NBI.
Here’s the 7 steps on how to apply for NBI Clearance at home, complete with instructions and screenshots!
- Register an NBI Online Account
- Fill Out Online Application Form
- Schedule an Appointment
- Pay NBI Clearance Fees
- Process NBI Clearance at the NBI Branch
- Have your Photo, Biometrics taken and Personal Information Verification.
- Claim your NBI Clearance
Register an NBI Online Account
Visit the official website of NBI Clearance Online and register an account (clearance.nbi.gov.ph).
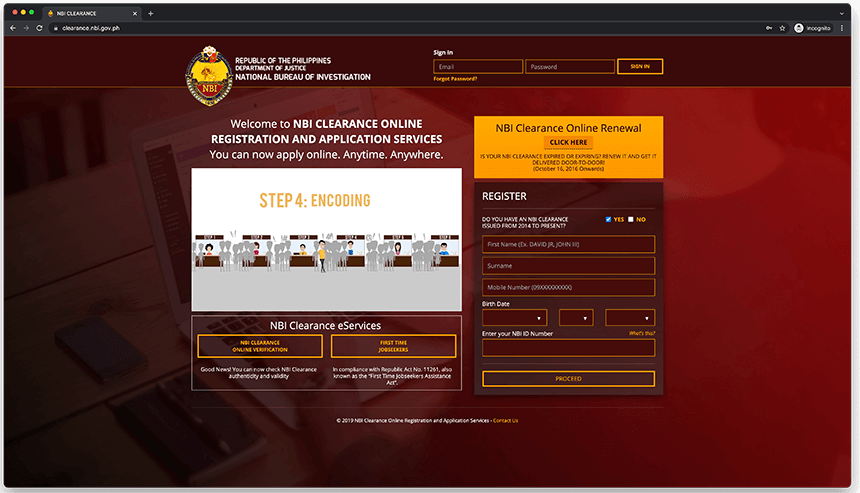
At the right side of your screen, find the NBI Online Registration box. See image below for reference.
If you already have an account with website and just want to do an NBI Renewal from your expired NBI Clearance, I recommend you read our latest tutorial on how to renew your NBI Clearance.
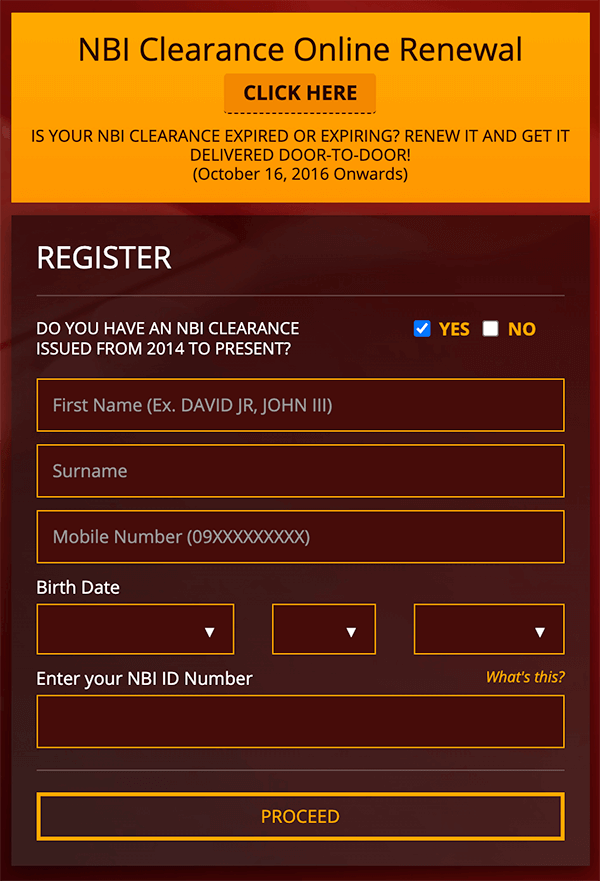
In the registration box, find the text that asks you “DO YOU HAVE AN NBI CLEARANCE ISSUED FROM 2014 TO PRESENT?”
Beside that is a check box for your response. Simply tick “NO”.

The NBI Online Application form for account registration will be updated.
Start filling out the required fields in the registration form.
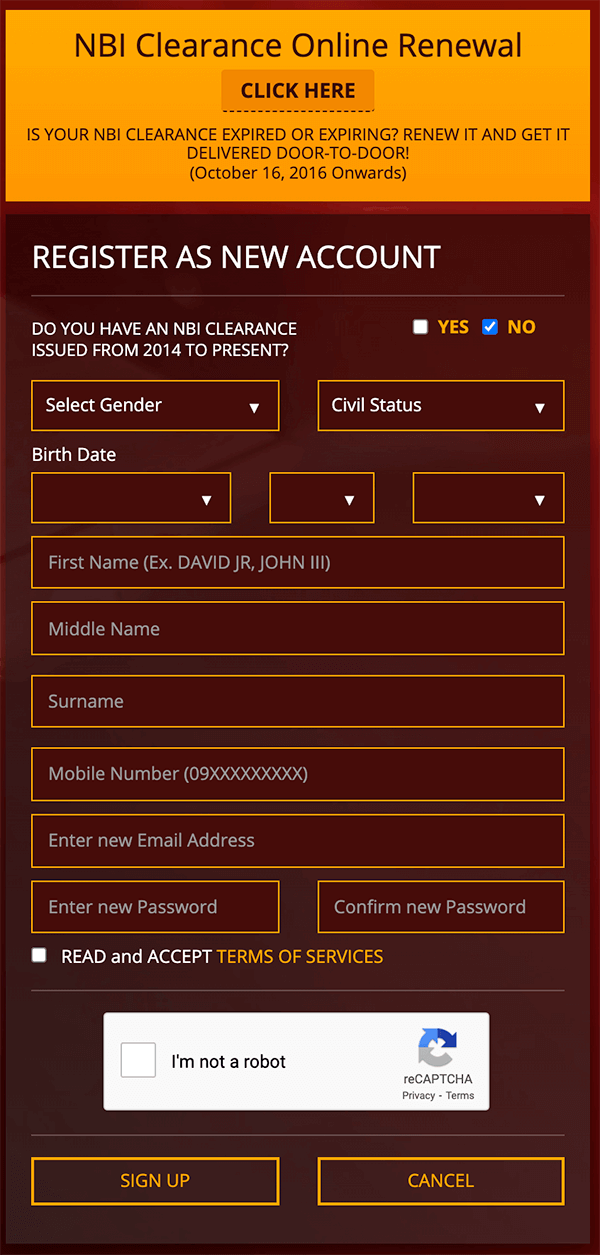
Make sure to enter all personal information correctly as these personal information cannot be modified later on.
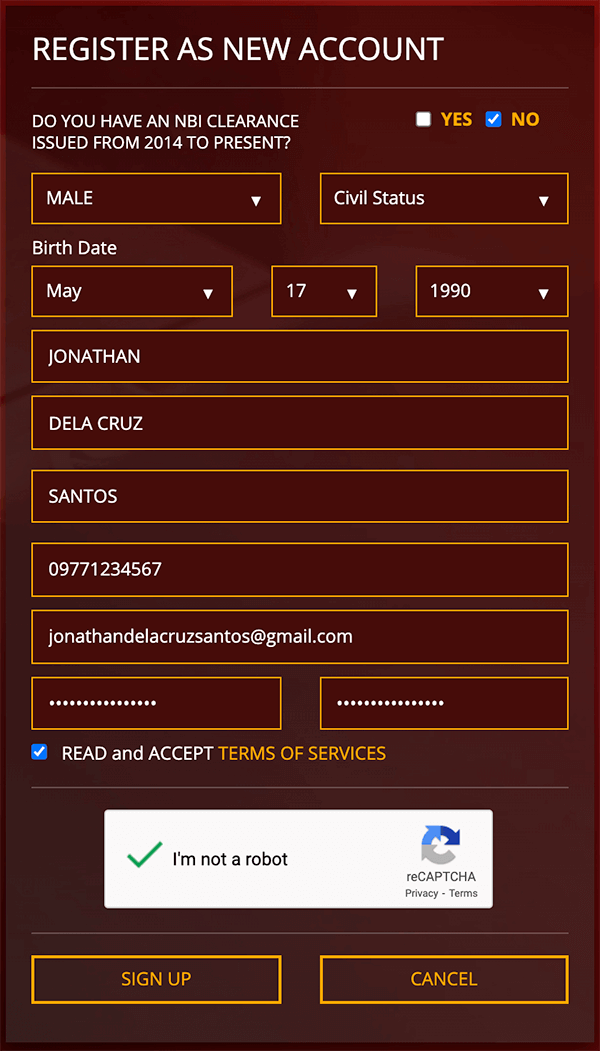
At the bottom of the registration form, tick the check box for the “READ and ACCEPT TERMS OF SERVICES”.
It will launch a small pop out window. Just press the “AGREE” button.
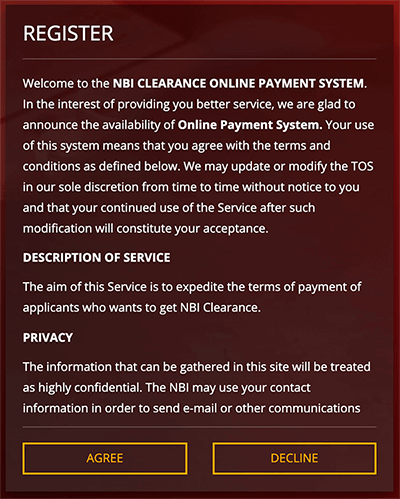
The next event that you should expect to happen is to receive an SMS from NBI Online website which contains a 6-digit One Time Password.
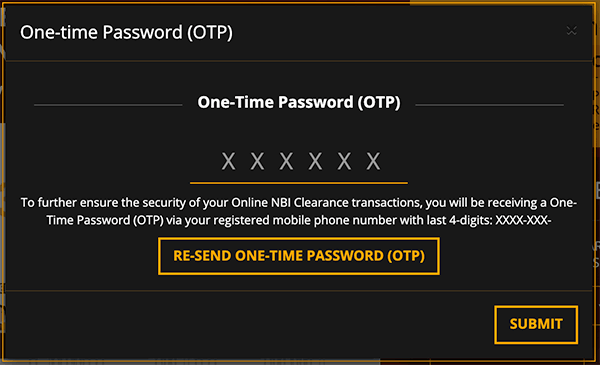
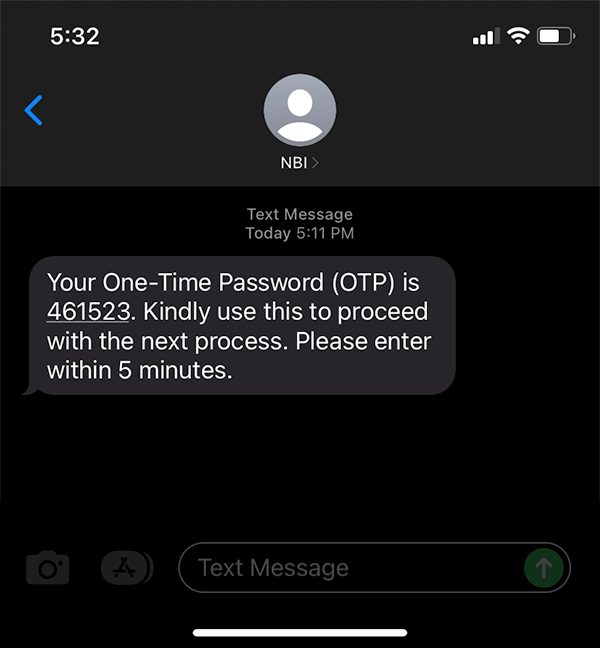
Check your mobile phone and look for the text message sent by “NBI”. Copy the one-time password.
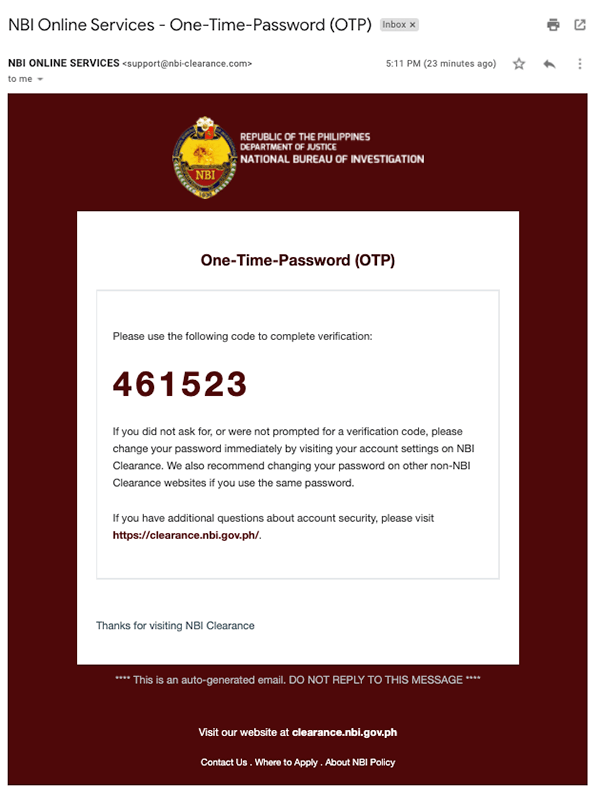
Note that if you check your email, you will also receive the same OTP sent to you thru SMS.
You may ignore this since you already have it from the earlier SMS Message.

Return to the NBI Online website and enter the 6-digit One Time Password in the space provided then press “Submit”.
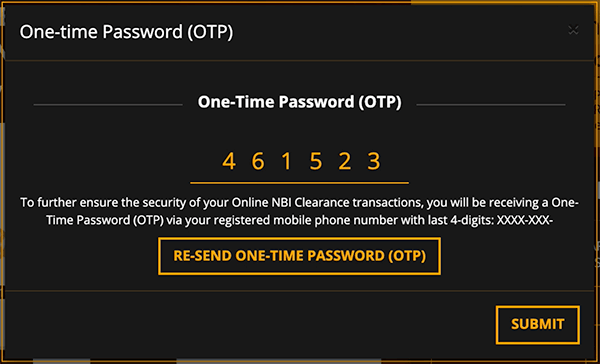
If you entered the OTP correctly, the website will prompt you that your registration is successful.

You may now log in to your account using the email address you used during the registration and the password you nominate.

We are now done with the NBI Online Account Registration. We will move to the next step.
NBI Online Application Form
During your first log in to the NBI Clearance Online website, your Application Form will be presented to you for completion.
NOTE: You may be interested in reading our newest tutorial about the Clearance NBI.GOV.COM.PH
Several personal information are needed to be filled out so start typing in your personal information.
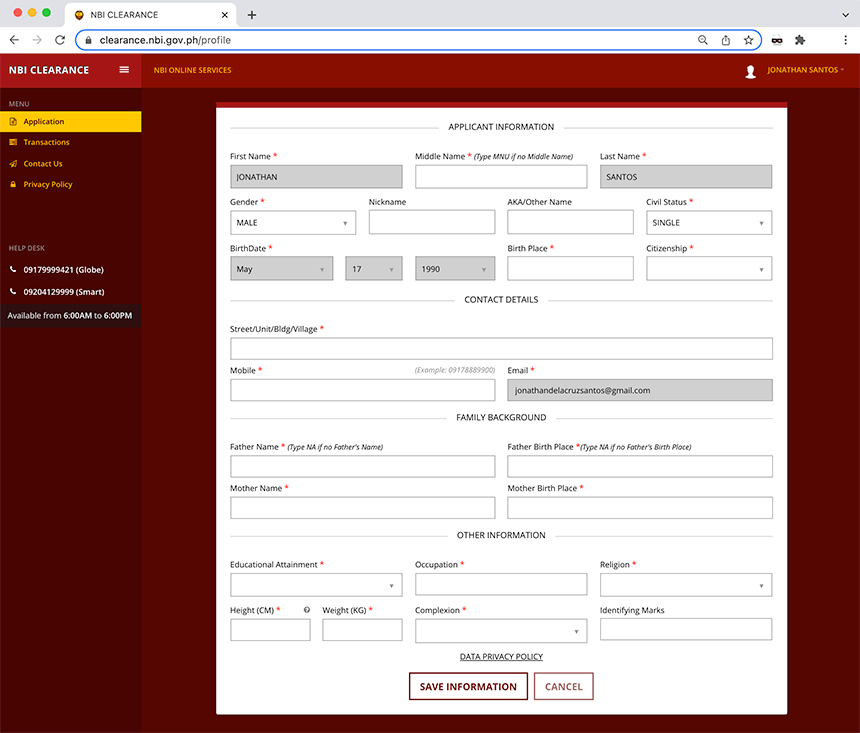
Enter the requested personal information correctly and then press the “Save information” button.
Review your profile before pressing the submit button. If you are done with your checks, you may now press the “Submit” button.
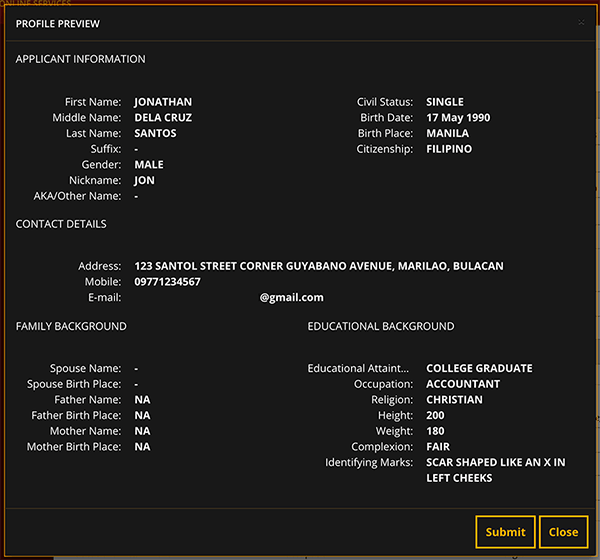
If you found any errors or need to modify an incorrect information, you may press the “Close” button and it will not proceed with the submission.
When you submit your NBI Online Profile, all the personal information will be saved.
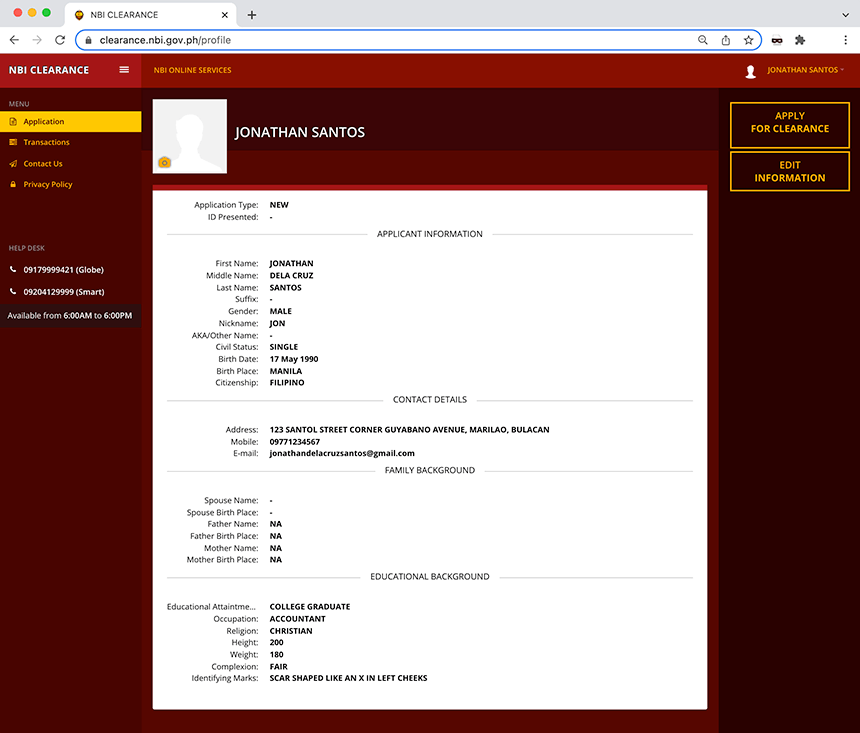
You are now ready to schedule an NBI Online Appointment.
Read: NBI Renewal Online — How to Renew your NBI Clearance Without Being Hassled!
Schedule an Appointment
To start this process, from the page show above, press the button that says “APPLY FOR CLEARANCE”.

A confirmation window will appear asking you what is your available valid ID.
Select from the dropdown list and enter your ID Number found in the physical copy of your valid ID.
Press the “I Agree” button once done.
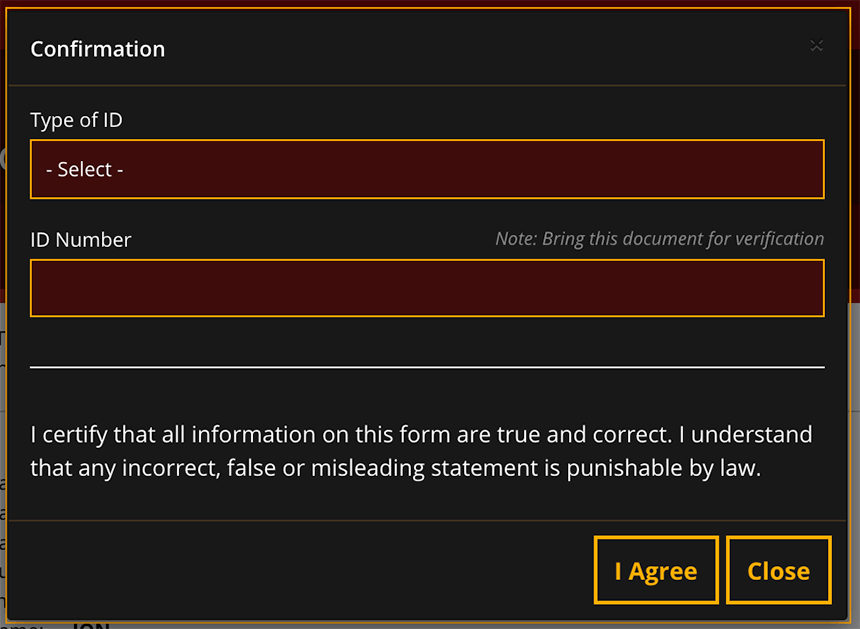
An important reminder will be shown.
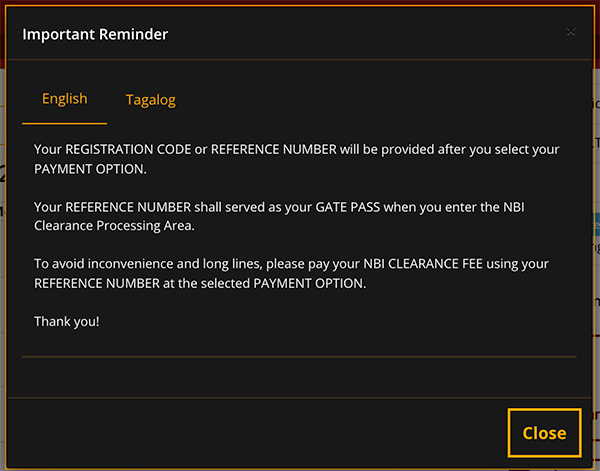
Read it as this is important for your NBI Online application. Press the close button once done.
The previous action will lead you to the NBI Online Appointment System page where you can schedule your appointment date and your preferred NBI Branch.
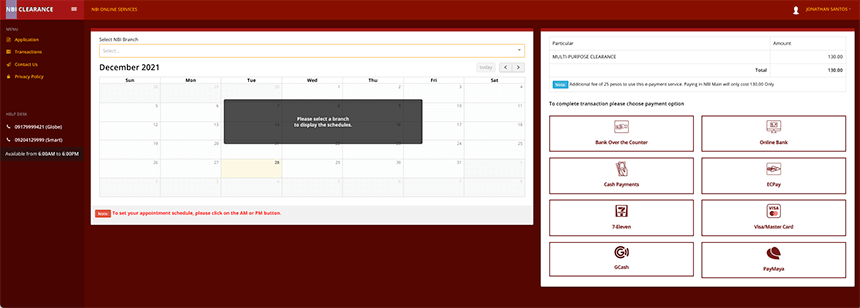
In the Select NBI Branch section, press the arrow down to show the list of available NBI Branches in the Philippines. Select your preferred NBI Branch.

After the NBI Branch selection, choose your preferred Date and Time (AM or PM). Press the blue box inside your preferred date to set the appointment date.
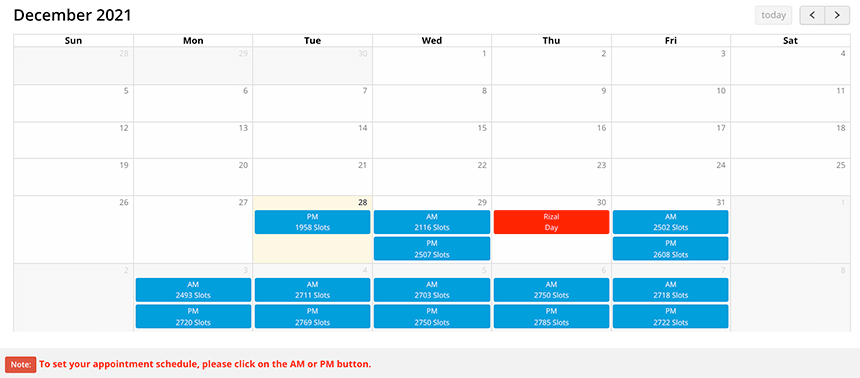
Notice at the right side of your screen, the Appointment Schedule has been updated after you selected your NBI Branch and the Date/Time.

You may also notice that the NBI Clearance Fee is already visible.
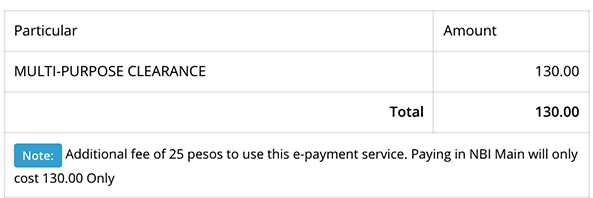
Please take note of the Additional Fee of P25 to use the e-payment service (GCash, Paymaya, 7-Eleven).
We will now proceed to the next step where you will settle the NBI Clearance Fee using your preferred mode of payment.
Payment of NBI Clearance Fee
If you made it this far, congratulations!
You are now ready to pay for your NBI Clearance Fee. From the list of payment option icons shown below, press the GCash icon/logo.
I forgot to tell you that we are going to use our GCash app to pay for our NBI Clearance Fees because its my preferred mode of payment and find it convenient. It’s a personal choice ?
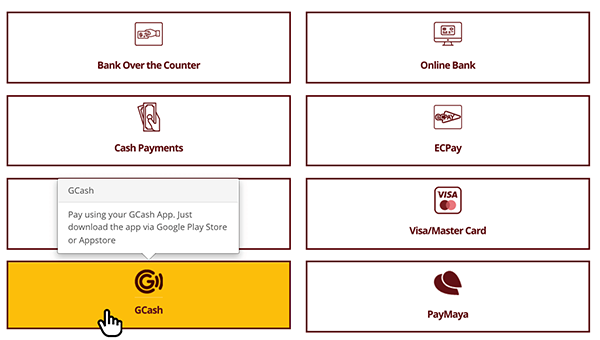
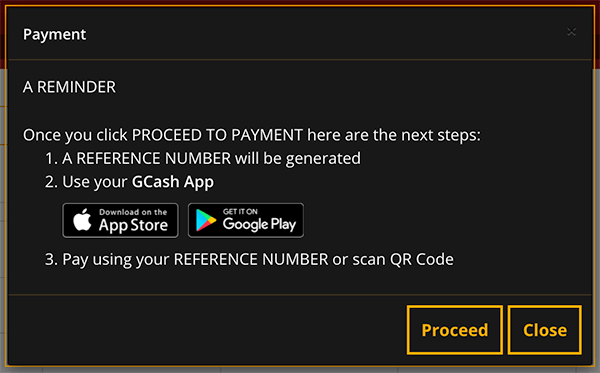
A Payment Reminder will be shown, read it carefully and understand. Press “Proceed”.
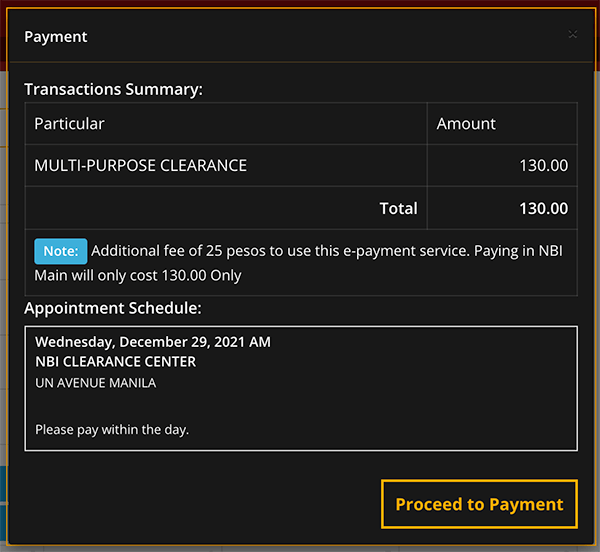
Again, the same Payment Summary and your Appointment Schedule will be shown. Take note of the information shown. Press the “Proceed to Payment” button.
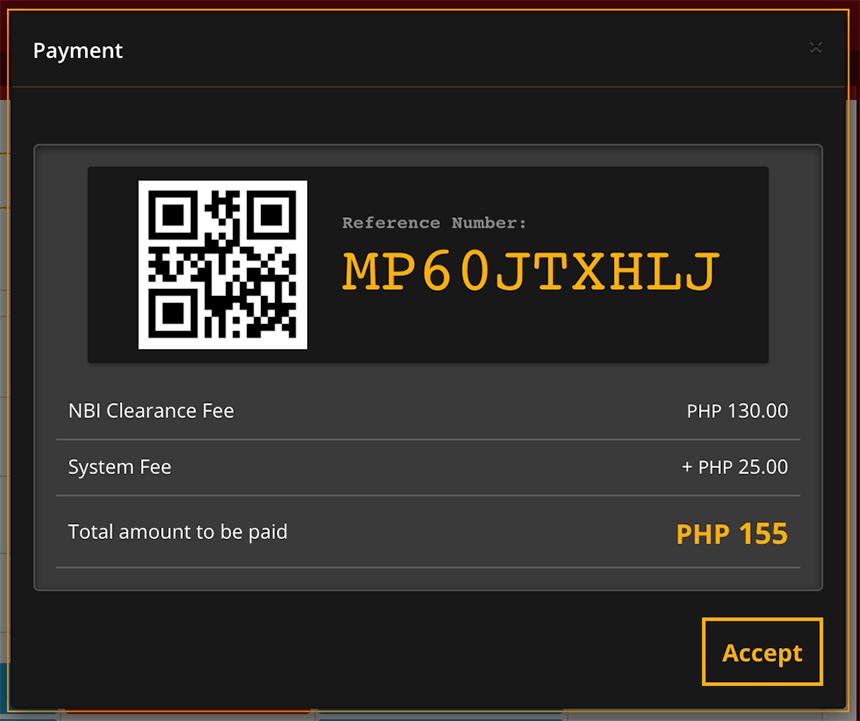
An NBI Online Reference number will be generated. Take a screenshot of the reference number or write it down. This is a crucial information to your NBI Clearance Online Application.
I can’t put emphasis on this but I will repeat it again, the NBI Online Reference number is important information. This is used during the NBI Clearance Fee payment and the actual processing of your NBI Clearance.
So make sure you have a copy of this.
Also, notice that the Total amount to be paid (Php 155) is shown? This is the final amount which you need to pay using your GCash app.
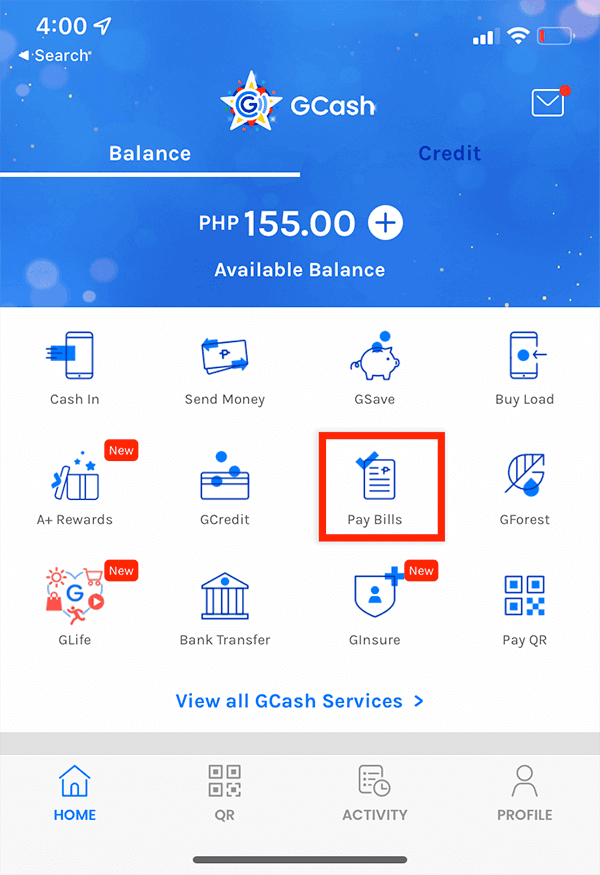
I will temporarily leave the NBI Clearance website and use my mobile phone to access my GCash app.
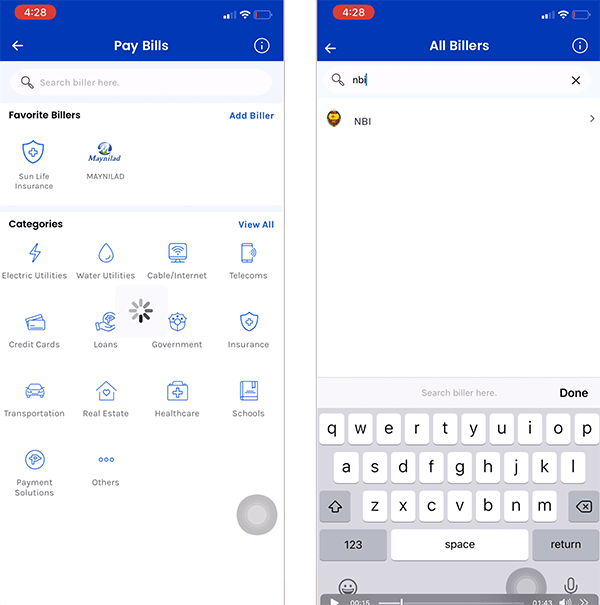
Log in to your GCash app and go to the Pay Bills section.
From the list of Billers, use the search functionality by typing “NBI” on it.
Remember I told you that the NBI Online Reference Number is important? This the (first) time you will use it.
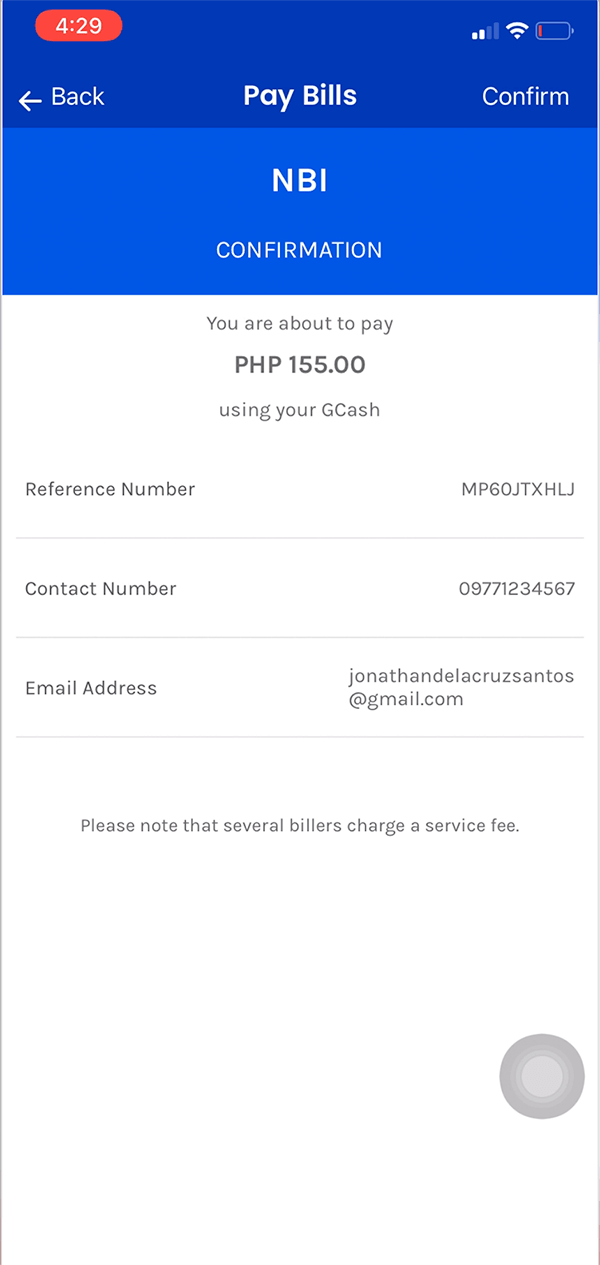
Enter the NBI Clearance Reference Number, your contact number, Amount and your email address.
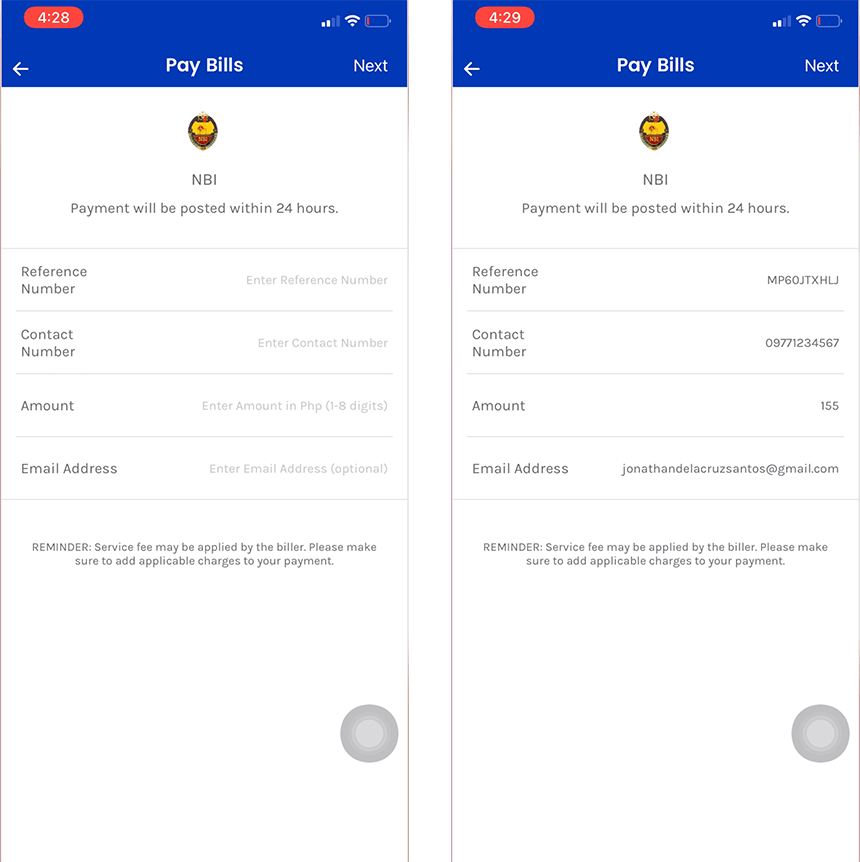
Review what you have written. Make sure you wrote the NBI Clearance Reference Number correctly because NBI Online doesn’t refund the payments made to incorrect Reference Number.
Press the “Confirm” button to pay for your NBI Online Fee.
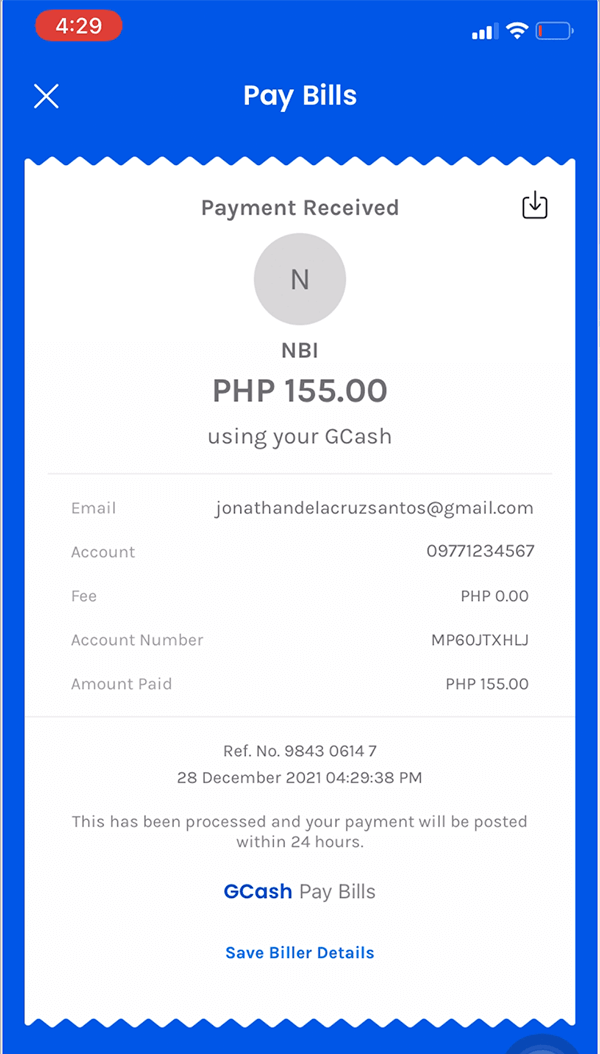
If the payment is successful, the GCash receipt will be shown. Take a screenshot and save this to your mobile device.
We have finished our task in GCash. We can now return to the NBI Online website to check the status of our scheduled appointment.
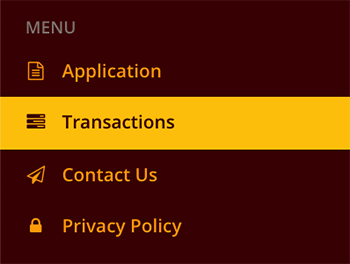
In the sidebar, go to “Transactions” page and find your NBI Online Reference Number.
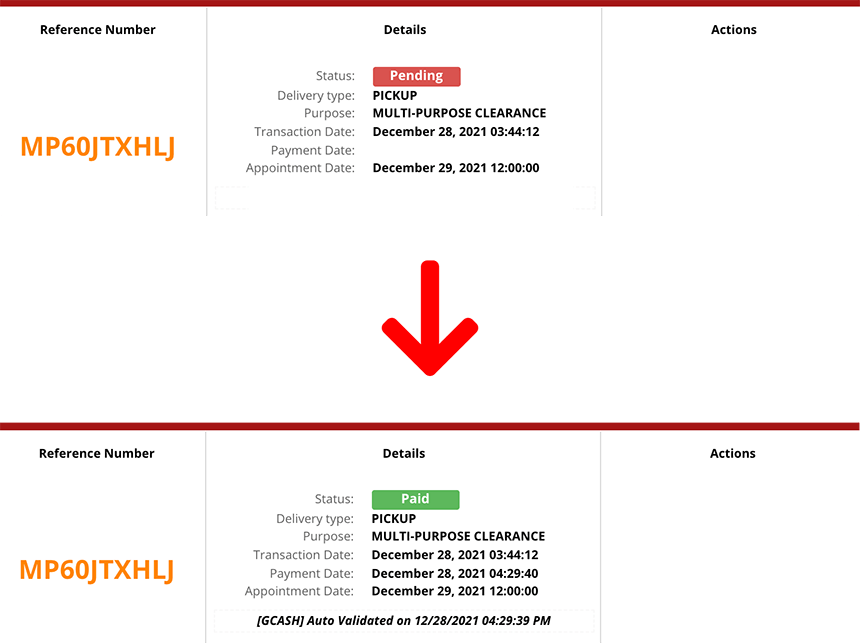
The status of your Reference Number must be “Paid” already since you have made the payment using your GCASH.
Now that you are finished with the payment, this ends the scheduling of our NBI Online Appointment. The next thing to do is to wait for the appointment date that we have scheduled before going to the NBI Branch.
Processing your NBI Clearance at the NBI Branch
When date of your Appointment arrives, we are required to appear in the NBI Branch we have selected.
Make sure that we bring two Valid IDs, the NBI Clearance Reference Number and the copy/screenshot of the receipt from GCASH.
Go to the NBI Branch on your scheduled appointment date and time.
Photo Capture, Biometrics and Personal Information Verification
When you arrive at the NBI Branch, expect these three (3) things to be done.
1. Photo Capture – where you will be asked to stand in from of the camera and have your photo taken.Note that the photo will be attached to your NBI Clearance.
2. Biometrics scanning – this is the step where all you fingers will be scanned and saved to the NBI Clearance Database.
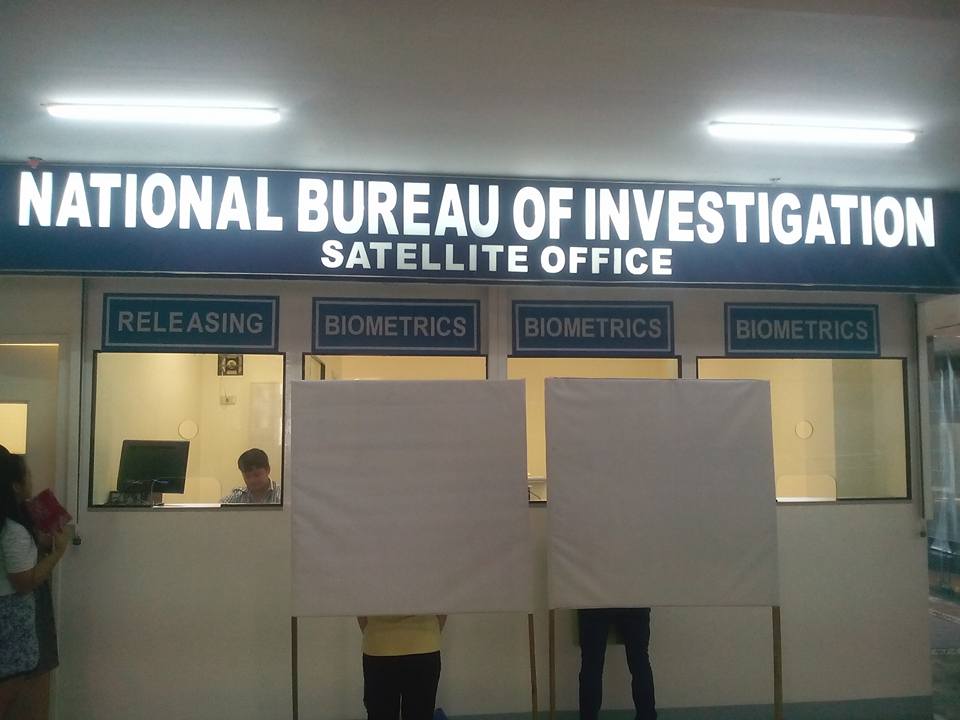
3. Personal Information Verification – the last step and one of the important step. The NBI Staff asks you to verify all the personal information written in your NBI Clearance are correct. The NBI Staff will show you his/her computer screen so you can easily verify.
If you found any errors or incorrect information, this is your chance to correct it. Don’t hesitate to mention this to them and they will be gladly modify it for you.
Releasing of NBI Clearance
Right after the steps above, the NBI Staff will submit your NBI Online data and perform checks and verifications. The preliminary checks and verifications will be quick and the result will be readily available immediately.
Wait for the instruction of the NBI Staff. There will be two kinds of instruction the NBI Staff will tell you:
1. The NBI Staff asks you to proceed to the Releasing section, that means you don’t have a HIT.
Proceed to the Releasing section and wait for your name to be called.
The NBI Staff give you your printed NBI Clearance. You can now go home.
OR
2. The NBI Staff asks you to return after ten (10) working days, this means that you have a HIT. To explain it, the NBI Staff holds your NBI Clearance for release because your name or your namesake have a criminal record or derogatory record.
Calm yourself!
You shouldn’t be worried if you don’t have a criminal record.
Unfortunately, you have to wait for ten (10) working days. Also you have to go back to the same NBI Branch where you process your NBI Clearance branch to personally claim your NBI Clearance.
Conclusion on NBI Online
This tutorial / blog is meant to be a guide for the NBI Online applicants which includes the process of how to properly schedule an appoint, pay the necessary NBI Fees and other tips that the reader would find useful and helpful when dealing with this agency.
Applying for an NBI Clearance is so much simpler nowadays and you don’t need to run around in order to apply for one.
All you need to do is go online to the NBI Clearance Online and follow the easy steps therein so that you can apply for your NBI Online yourself with no hassle at all.
Like and Share this tutorial in Facebook!
#NBIClearance #NBIClearanceOnline #HowToApplyNBIClearance #NBIOnline

15 thoughts on “NBI Online: Everything you need to know in applying NBI Clearance!”
This is the first create of nbi.. I want to create nbi to my renewal of work..
This is the first create of nbi.. I want to create nbi to renew in my
work..
record nbi
i forgot my password
what is my schedule to collect my nbi
THE WEBSITE IS DOWN FOR A FEW MONTHS!!! WHAT’S GOING ON? SUCH A IMPORTANT SYSTEM CAN’T BE DOWN! PLEASE FIX IT ASAP! .. I NEED THE NBI CLEARANCE FOR CANADA VISA. IT NEED RECENTLY 3 MONTHS CERT…
How to schedule appointment ndi
How to schedule appointment NBI
Rotzs9Z5yp9
KtiS3bhk0eC
ReqPi3OjTdF